大数据学习笔记1-Hadoop

Hadoop1
一.前期
分布式系统架构,大小自己会扩展
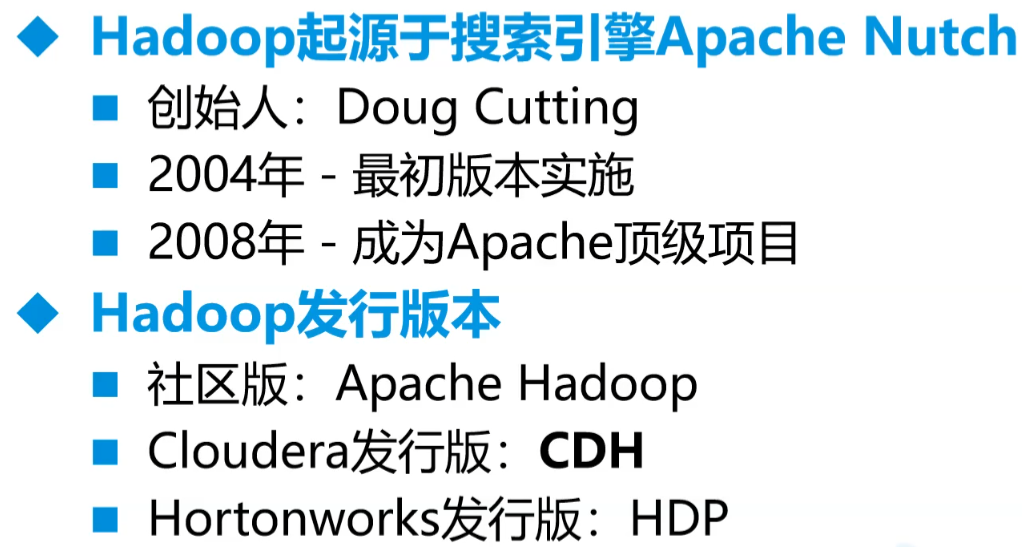
发展及版本

- Apache原始的,标准版,版本先进,免费,稳定性不足
- 我们这边用CDH,在原有Apache版本上封装了很多包,稳定性高于Apache版本,后来开始收费被Hortonworks收购。CDH老版本不收费。
使用原因
高扩展性
低成本服务器集群
高可靠性
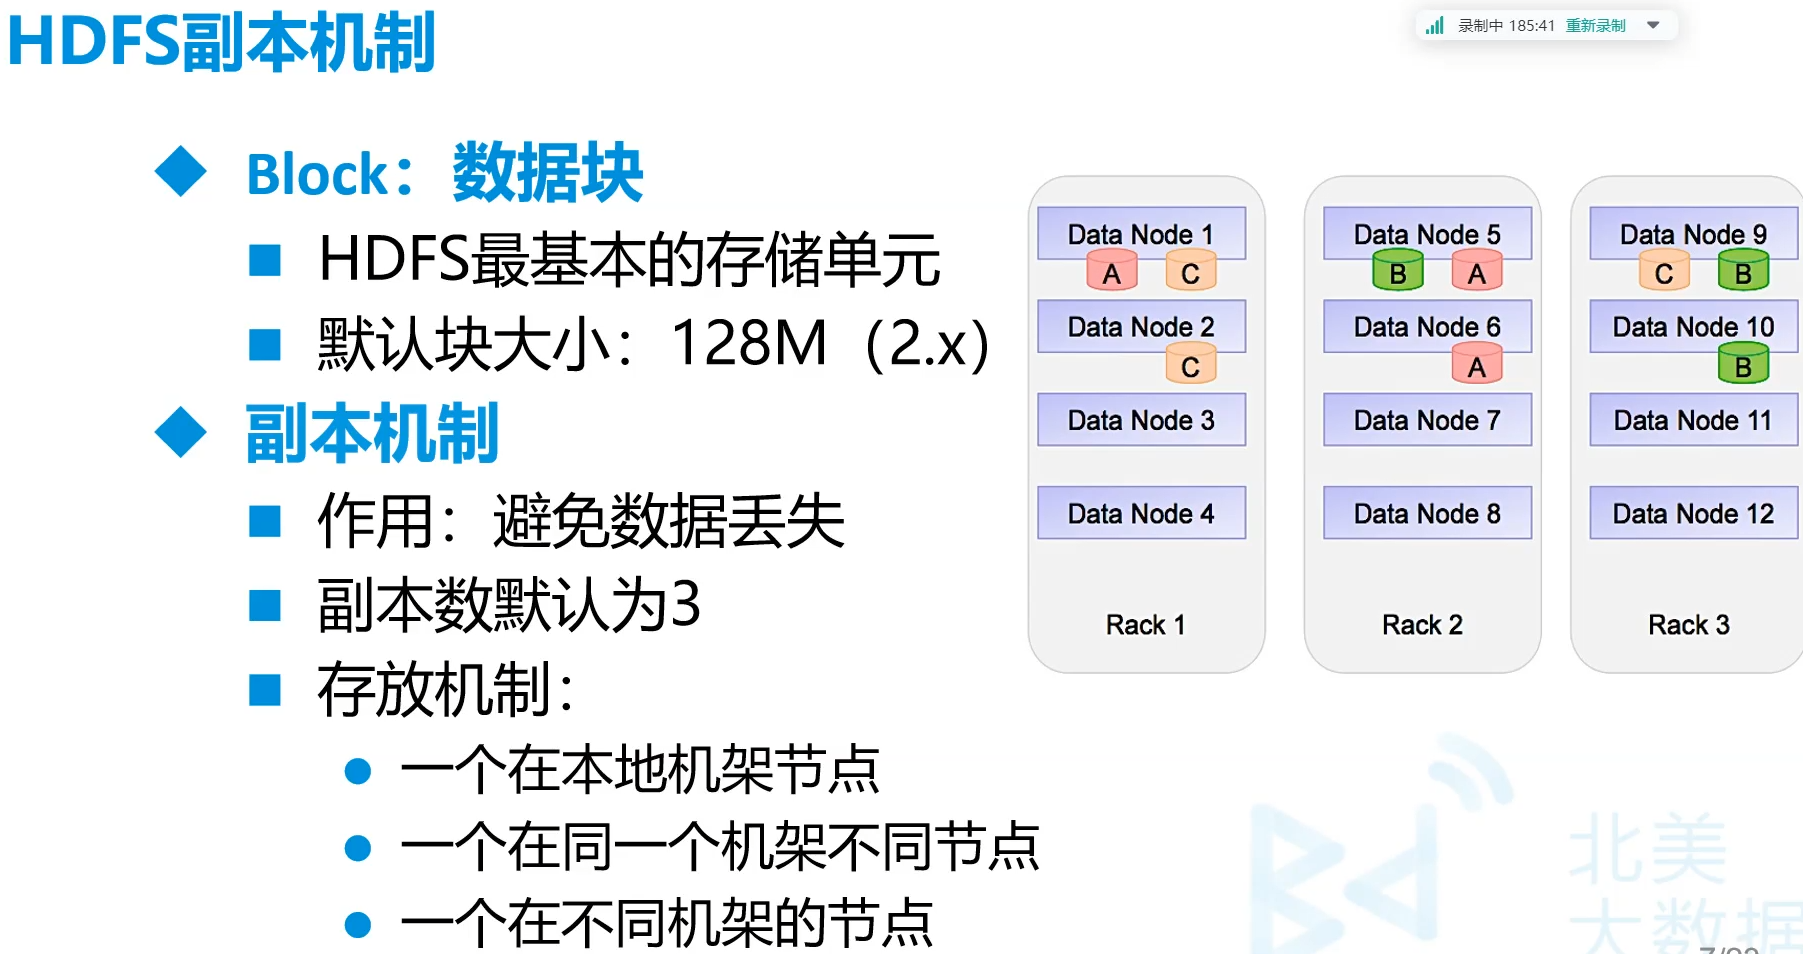
默认三个副本
高容错性
低成本
针对海量数据
灵活,任意类型数据
开源
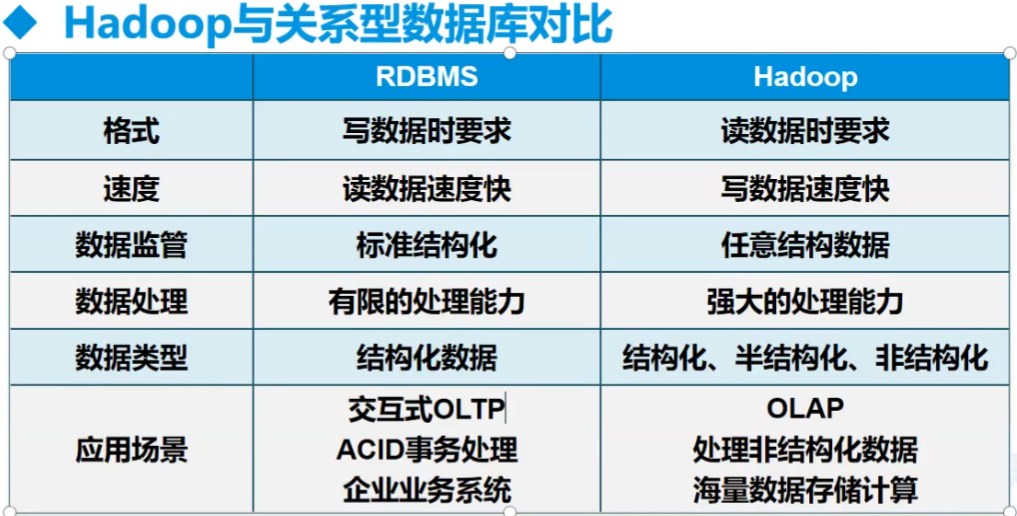
和普通的对比
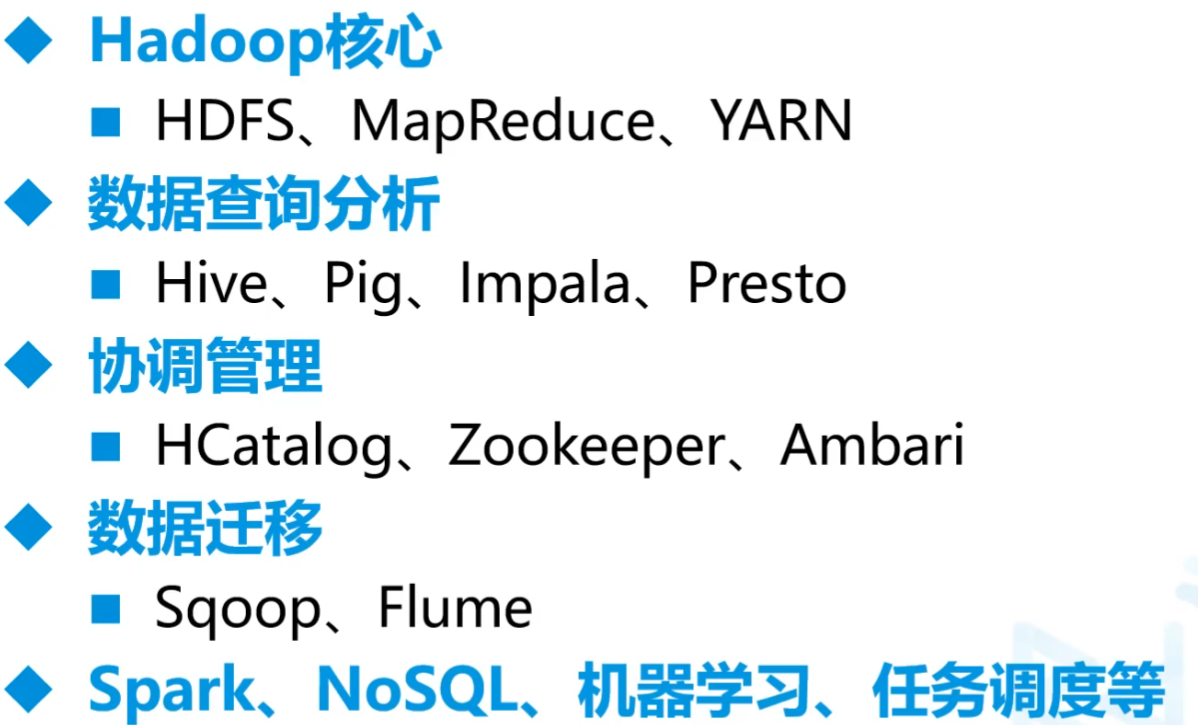
Hadoop生态圈
Hadoop核心
HDFS、MapReduce、YARN
yarn调度服务 hdfs存储服务 mapreduce主要是分布式的计算
Hive、Zookeeper、数据迁移、spark
Sqoop:数据库取
Flume:半/非结构化数据结构取
python中类似于springboot的架构:Django Flask FastAPI
Hadoop对内多线程,对外单线程
端口
8088 任务查看监控运行
50070 hdfs查看
9000 hdfs服务端口
存储的数据
- 结构化数据: 格式化数据 表
- 半结构化数据:日志 文件
- 非结构化数据:图片 图
二.Hadoop架构
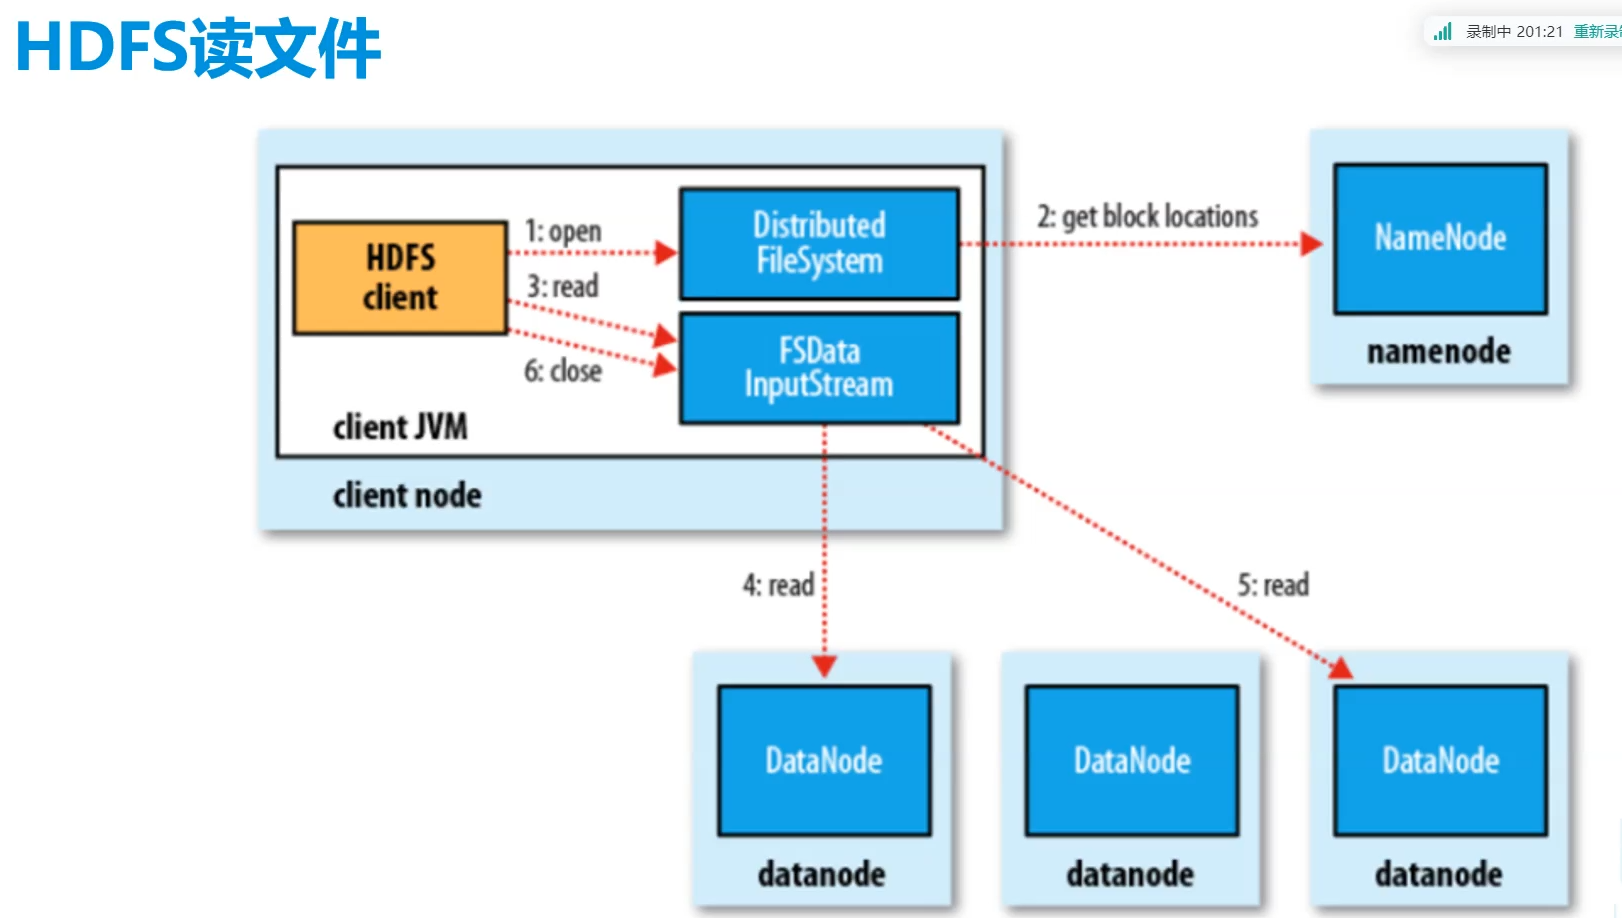
HDFS(Hadoop Distributed File System)
分布式文件系统,解决分布式存储
MapReduce
分布式计算框架
YARN
- 分布式资源管理系统
- 在Hadoop 2.x中引入
(一)环境搭建
hadoop+zookeeper+hbase
这边搭建CDH5.14.2 - Hadoop2.6.0
后期Apache Hadoop 3.1.3
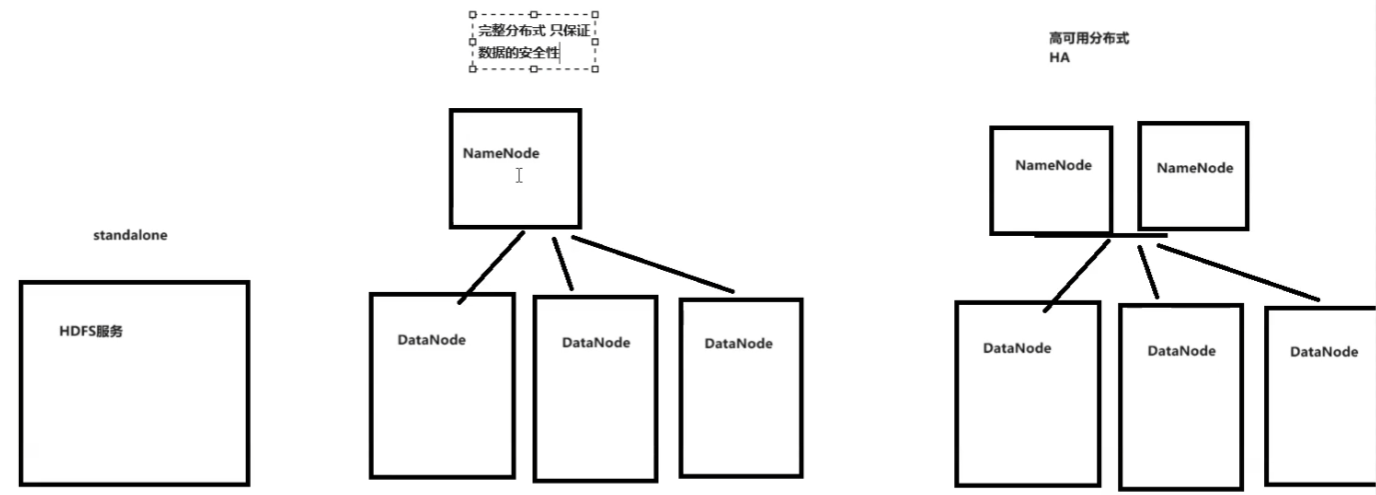
单机 完整版
高可用分布式HA
A.单机配置
布置好虚拟机基础配置(要jdk1.8)
把hadoop-2.6.0-cdh5.14.2.tar.gz放入/opt
解压并且到相应文件夹中
1
2
3
tar -zxf hadoop-2.6.0-cdh5.14.2.tar.gz
mv hadoop-2.6.0-cdh5.14.2 soft/hadoop260
cd /opt/soft/hadoop260/etc/hadoop/改文件
1
2
3
# vim hadoop-env.sh
改JAVA_HOME 为自己的路径比如:
export JAVA_HOME=/opt/soft/jdk1801
2
3
4
5
6
7
8
9
10
11
12
13
14
15
16
17
18
19
20
21
22
23
24
25
26# vim core-site.xml 这个下面
1.指定文件系统(记得改IP)
2.指定存放目录
3.指定hdfs的使用白名单(这边的所有的root组下的)
<configuration>
<property>
<name>fs.defaultFS</name>
<value>hdfs://192.168.179.139:9000</value>
</property>
<property>
<name>hadoop.tmp.dir</name>
<value>/opt/soft/hadoop/tmp</value>
</property>
<property>
<name>hadoop.proxyuser.root.groups</name>
<value>*</value>
</property>
<property>
<name>hadoop.proxyuser.root.hosts</name>
<value>*</value>
</property>
<property>
<name>hadoop.proxyuser.root.users</name>
<value>*</value>
</property>
</configuration>往往两个副本在同一个机架上,另一个副本在远端
1
2
3
4
5
6
7
8# vim hdfs-site.xml
副本数,这边1,后面要改(因为这边只用了单机)
<configuration>
<property>
<name>dfs.replication</name>
<value>1</value>
</property>
</configuration>1
2
3
4
5
6
7
8
9cp mapred-site.xml.template mapred-site.xml
vim mapred-site.xml
计算引擎框架叫yarn
<configuration>
<property>
<name>mapreduce.framework.name</name>
<value>yarn</value>
</property>
</configuration>1
2
3
4
5
6
7
8
9
10
11
12
13
14
15
16vim yarn-site.xml
资源管理器配置,自动管理资源
主要配置shuffle
<configuration>
<!-- Site specific YARN configuration properties -->
<property>
<name>yarn.resourcemanager.localhost</name>
<value>localhost</value>
</property>
<property>
<name>yarn.nodemanager.aux-services</name>
<value>mapreduce_shuffle</value>
</property>
</configuration>/etc/profile中最后加上1
2
3
4
5
6
7
8
9# Hadoop Env
export HADOOP_HOME=/opt/soft/hadoop260 # 这边要改jdk地址
export HADOOP_MAPRED_HOME=$HADOOP_HOME
export HADOOP_COMMON_HOME=$HADOOP_HOME
export HADOOP_HDFS_HOME=$HADOOP_HOME
export YARN_HOME=$HADOOP_HOME
export HADOOP_COMMON_LIB_NATIVE_DIR=$HADOOP_HOME/lib/native
export PATH=$PATH:$HADOOP_HOME/sbin:$HADOOP_HOME/bin
export HADOOP_INSTALL=$HADOOP_HOME密钥生成
1
2
3ssh-keygen -t rsa -P ''
cd ~/.ssh/
ssh-copy-id -i id_rsa.pub root@本机ip试一下
ssh hadoopstandalone然后退出exit ,那个hadoopstandalone是之前改的主机名格式化hdfs
1
2source /etc/profile
hdfs namenode -format启动集群
1
2
3start-all.sh
yes
yes1
stop-all.sh # 关闭集群
查看是否成功
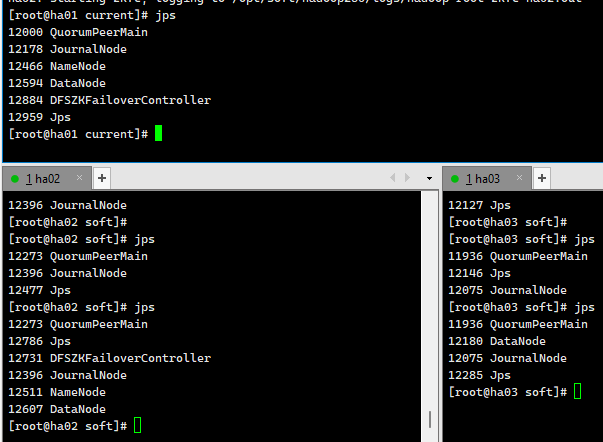
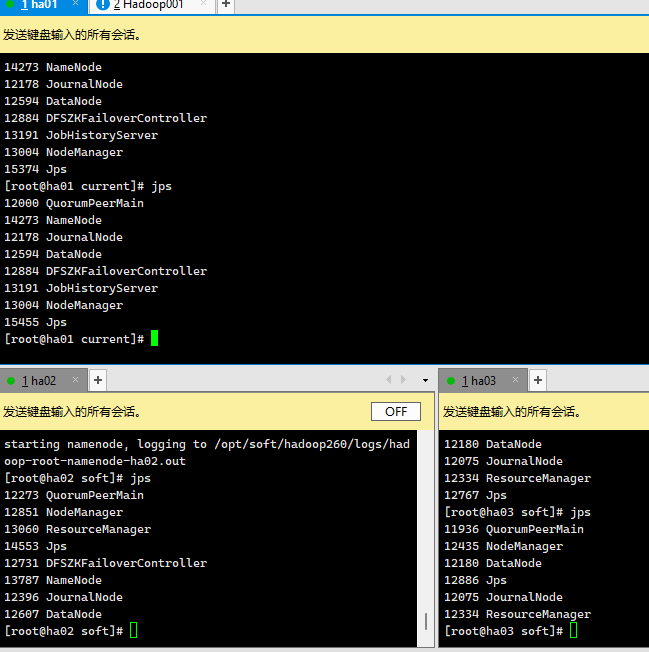
jps除了jps外一共要5个
NameNode DataNode挂掉且配置没有问题的话,可以把tmp删了,把logs里面的东西删了,再重格式化一遍
从浏览器查看
使用和api
- Linux中
1 | hadoop fs -mkdir /mydemo # 建立一个文件夹 |
Java中
pom.xml中依赖
版本要匹配
hadoop common是工具包
hadoop client是客户端
Hadoop hdfs 记得删test
1
2
3
4
5
6
7
8
9
10
11
12
13
14
15
16
17
18
19
20
21
22
23
24
25
26
27
<properties>
<hadoop.version>2.6.0</hadoop.version>
</properties>
<dependencies>
<!-- https://mvnrepository.com/artifact/org.apache.hadoop/hadoop-common -->
<dependency>
<groupId>org.apache.hadoop</groupId>
<artifactId>hadoop-common</artifactId>
<version>${hadoop.version}</version>
</dependency>
<!-- https://mvnrepository.com/artifact/org.apache.hadoop/hadoop-client -->
<dependency>
<groupId>org.apache.hadoop</groupId>
<artifactId>hadoop-client</artifactId>
<version>${hadoop.version}</version>
</dependency>
<!-- https://mvnrepository.com/artifact/org.apache.hadoop/hadoop-hdfs -->
<dependency>
<groupId>org.apache.hadoop</groupId>
<artifactId>hadoop-hdfs</artifactId>
<version>${hadoop.version}</version>
</dependency>
</dependencies>
Java中进行IO操作
读操作
1
2
3
4
5
6
7
8
9
10
11
12
13
14
15public static void main( String[] args ) throws Exception
{
// 通过地址找到hdfs文件系统
FileSystem fs = FileSystem.get(new URI("hdfs://192.168.179.139:9000")
, new Configuration());
// 获取输入流
FSDataInputStream fis = fs.open(new Path("/mydemo/abc"));
// 查看流信息
String line="";
while ((line = fis.readLine()) != null) {
System.out.println(line);
}
fis.close();
fs.close();
}写数据
1
2
3
4
5
6
7
8
9
10
11
12
13
14
15
16
17
18
19
20
21
22
23
24
25package org.example;
import org.apache.hadoop.conf.Configuration;
import org.apache.hadoop.fs.FSDataInputStream;
import org.apache.hadoop.fs.FileSystem;
import org.apache.hadoop.fs.Path;
import org.apache.hadoop.io.IOUtils;
import java.io.FileOutputStream;
import java.net.URI;
public class App
{
public static void main( String[] args ) throws Exception
{
// 通过地址找到hdfs文件系统
FileSystem fs = FileSystem.get(new URI("hdfs://192.168.179.139:9000")
, new Configuration());
// 获取输入流
FSDataInputStream fis = fs.open(new Path("/mydemo/abc"));
// 准备一个写入流
FileOutputStream fos = new FileOutputStream("d:/d.txt");
IOUtils.copyBytes(fis,fos,4096,true);
}
}
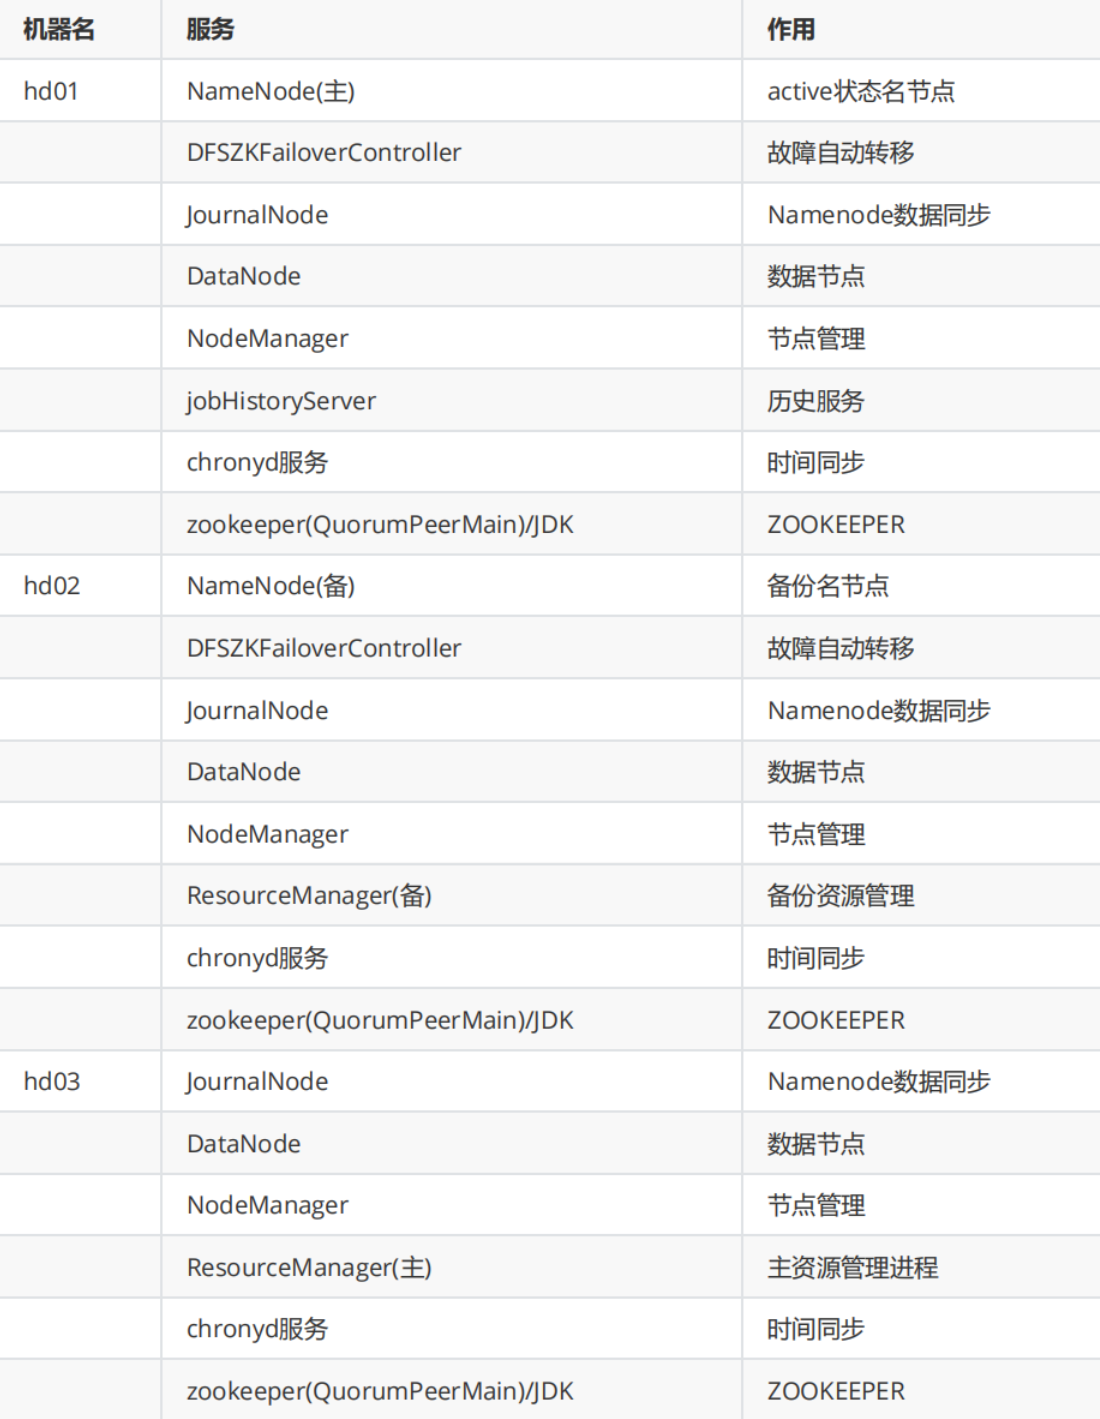
B.高可用hadoop集群搭建
准备工作
安装3台centos7 服务器
配置名字hd01\hd02\hd03
配置网络static
关闭防火墙
hd01可以访问hd02、hd03(同理其他都可互相访问)
1
2
3
4
5
6
7
8
9# 三个都要
#hd01 做ssh 公私钥 无秘
ssh-keygen -t rsa -P ''
# copy 公钥到 hd02 hd03
ssh-copy-id -i .ssh/id_rsa.pub root@ha01
ssh-copy-id -i .ssh/id_rsa.pub root@ha02
ssh-copy-id -i .ssh/id_rsa.pub root@ha03
# ssh-copy-id 192.168.192.201#hd02
# ssh-copy-id 192.168.192.202#hd03所有服务器时间同步
1
2
3
4
5
6
7
8
9
10# 安装chrony
yum -y install chrony
#配置chrony
vi /etc/chrony.conf
server ntp1.aliyun.com
server ntp2.aliyun.com
server ntp3.aliyun.com
注释掉server 0.centos.pool.ntp.org iburst
#启动chrony
systemctl start chronyd安装wget
1
yum install -y wget
安装psmisc(linux命令工具包 namenode主备切换时要用到 只需要安装在两个namenode节点上)(好像暂时不用,后面看看情况)
1
yum install -y psmisc
修改源
集群部署
先配置zookeeper,只要一台为主
zookeeper的端口是2181
1
2
3
4
5
6
7
8
9
10
11
12
13
14
15
16
17
18
19# 这边的在第一台中
# 先把相应压缩包放到/opt
cd /opt
tar -zxf zookeeper-3.4.5-cdh5.14.2.tar.gz
mv zookeeper-3.4.5-cdh5.14.2 soft/zk345
cd soft/zk345/conf/
cp zoo_sample.cfg zoo.cfg
# vim zoo.cfg
dataDir=/opt/soft/zk345/data
在最后一行加上
server.1=192.168.179.141:2888:3888 # 这两个端口可以改,前一个是互相通信的,后一个是选老大的
server.2=192.168.179.142:2888:3888
server.3=192.168.179.143:2888:3888
# 保存退出
cd ..
mkdir data
echo "1" > data/myid1
2
3
4
5
6# 把/opt/soft/zk345拷贝到其他两个中
scp -r zk345/ root@ha02:/opt/soft/
scp -r zk345/ root@ha03:/opt/soft/
# 修改/opt/soft/zk345/data/myid的id
2号改2 3号改3三个同时配置文件
1
2
3
4
5
6
7
8# vim /etc/profile最后加
#Zookeeper Env
export ZOOKEEPER_HOME=/opt/soft/zk345
export PATH=$PATH:$ZOOKEEPER_HOME/bin
# 保存退出
source /etc/profile启动zookeeper
1
2zkServer.sh start
zkServer.sh stop # 停止jps看一下
多一个QuorumPeerMain就是正确的
配置hadoop集群
先在第一个中配置,把hadoop相应文件放到/opt下
1
2
3
4
5
6
7
8
9
10
11
12
13
14
15cd /opt
tar -zxf hadoop-2.6.0-cdh5.14.2.tar.gz
mv hadoop-2.6.0-cdh5.14.2 /opt/soft/hadoop260
mkdir -p /opt/soft/hadoop260/tmp
mkdir -p /opt/soft/hadoop260/dfs/journalnode_data
mkdir -p /opt/soft/hadoop260/dfs/edits
mkdir -p /opt/soft/hadoop260/dfs/datanode_data
mkdir -p /opt/soft/hadoop260/dfs/namenode_data
cd /opt/soft/hadoop260/etc/hadoop
# vim hadoop-env.sh
export JAVA_HOME=/opt/soft/jdk180
export HADOOP_CONF_DIR=/opt/soft/hadoop260/etc/hadoop
# 保存退出vim core-site.xml 中文到时候删了 主机名记得改
1
2
3
4
5
6
7
8
9
10
11
12
13
14
15
16
17
18
19
20
21
22
23
24
25
26
27
28
29
30
31
32
33<configuration>
<!--指定hadoop集群在zookeeper上注册的节点名-->
<property>
<name>fs.defaultFS</name>
<value>hdfs://hacluster</value> 集群的名字
</property>
<!--指定hadoop运行时产生的临时文件-->
<property>
<name>hadoop.tmp.dir</name>
<value>file:///opt/soft/hadoop260/tmp</value>
</property>
<!--设置缓存大小 默认4KB,并行状态下每个文件都开就会很大-->
<property>
<name>io.file.buffer.size</name>
<value>4096</value>
</property>
<!--指定zookeeper的存放地址-->
<property>
<name>ha.zookeeper.quorum</name>
<value>ha01:2181,ha02:2181,ha03:2181</value>
<!--这个地方改名别忘了-->
</property>
<!--配置允许root代理访问主机节点-->
<property>
<name>hadoop.proxyuser.root.hosts</name>
<value>*</value>
</property>
<!--配置该节点允许root用户所属的组-->
<property>
<name>hadoop.proxyuser.root.groups</name>
<value>*</value>
</property>
</configuration>vim hdfs-site.xml 中文删了 主机名记得改
如果用固态硬盘128M就太小了,可以放大
1
2
3
4
5
6
7
8
9
10
11
12
13
14
15
16
17
18
19
20
21
22
23
24
25
26
27
28
29
30
31
32
33
34
35
36
37
38
39
40
41
42
43
44
45
46
47
48
49
50
51
52
53
54
55
56
57
58
59
60
61
62
63
64
65
66
67
68
69
70
71
72
73
74
75
76
77
78
79
80
81
82
83
84
85
86
87
88
89
90
91
92
93
94
95
96
97
98
99
100
101
102
103
104
105
106
107
108<configuration>
<property>
<!--数据块默认大小128M-->
<name>dfs.block.size</name>
<value>134217728</value>
</property>
<property>
<!--副本数量 不配置默认为3-->
<name>dfs.replication</name>
<value>3</value>
</property>
<property>
<!--namenode节点数据(元数据)的存放位置-->
<name>dfs.name.dir</name>
<value>file:///opt/soft/hadoop260/dfs/namenode_data</value>
</property>
<property>
<!--datanode节点数据(元数据)的存放位置-->
<name>dfs.data.dir</name>
<value>file:///opt/soft/hadoop260/dfs/datanode_data</value>
</property>
<property>
<!--开启hdfs的webui界面-->
<name>dfs.webhdfs.enabled</name>
<value>true</value>
</property>
<property>
<!--datanode上负责进行文件操作的线程数-->
<name>dfs.datanode.max.transfer.threads</name>
<value>4096</value>
</property>
<property>
<!--指定hadoop集群在zookeeper上的注册名-->
<name>dfs.nameservices</name>
<value>hacluster</value>
</property>
<property>
<!--hacluster集群下有两个namenode分别是nn1,nn2-->
<name>dfs.ha.namenodes.hacluster</name>
<value>nn1,nn2</value>
</property>
<!--nn1的rpc、servicepc和http通讯地址 -->
<property>
<name>dfs.namenode.rpc-address.hacluster.nn1</name>
<value>ha01:9000</value>
</property>
<property>
<name>dfs.namenode.servicepc-address.hacluster.nn1</name>
<value>ha01:53310</value>
</property>
<property>
<name>dfs.namenode.http-address.hacluster.nn1</name>
<value>ha01:50070</value>
</property>
<!--nn2的rpc、servicepc和http通讯地址 -->
<property>
<name>dfs.namenode.rpc-address.hacluster.nn2</name>
<value>ha02:9000</value>
</property>
<property>
<name>dfs.namenode.servicepc-address.hacluster.nn2</name>
<value>ha02:53310</value>
</property>
<property>
<name>dfs.namenode.http-address.hacluster.nn2</name>
<value>ha02:50070</value>
</property>
<property>
<!--指定Namenode的元数据在JournalNode上存放的位置-->
<name>dfs.namenode.shared.edits.dir</name>
<value>qjournal://ha01:8485;ha02:8485;ha03:8485/hacluster</value>
</property>
<property>
<!--指定JournalNode在本地磁盘的存储位置-->
<name>dfs.journalnode.edits.dir</name>
<value>/opt/soft/hadoop260/dfs/journalnode_data</value>
</property>
<property>
<!--指定namenode操作日志存储位置-->
<name>dfs.namenode.edits.dir</name>
<value>/opt/soft/hadoop260/dfs/edits</value>
</property>
<property>
<!--开启namenode故障转移自动切换-->
<name>dfs.ha.automatic-failover.enabled</name>
<value>true</value>
</property>
<property>
<!--配置失败自动切换实现方式-->
<name>dfs.client.failover.proxy.provider.hacluster</name>
<value>org.apache.hadoop.hdfs.server.namenode.ha.ConfiguredFailoverProxyProvider</value>
</property>
<property>
<!--配置隔离机制-->
<name>dfs.ha.fencing.methods</name>
<value>sshfence</value>
</property>
<property>
<!--配置隔离机制需要SSH免密登录-->
<name>dfs.ha.fencing.ssh.private-key-files</name>
<value>/root/.ssh/id_rsa</value>
</property>
<property>
<!--hdfs文件操作权限 false为不验证-->
<name>dfs.premissions</name>
<value>false</value>
</property>
</configuration>1
2
3
4
5
6
7
8
9
10
11
12
13
14
15
16
17
18
19
20
21
22
23
24
25
26cp mapred-site.xml.template mapred-site.xml
vim mapred-site.xml
主机名记得改
<configuration>
<property>
<!--指定mapreduce在yarn上运行-->
<name>mapreduce.framework.name</name>
<value>yarn</value>
</property>
<property>
<!--配置历史服务器地址-->
<name>mapreduce.jobhistory.address</name>
<value>ha01:10020</value>
</property>
<property>
<!--配置历史服务器webUI地址-->
<name>mapreduce.jobhistory.webapp.address</name>
<value>ha01:19888</value>
</property>
<property>
<!--开启uber模式-->
<name>mapreduce.job.ubertask.enable</name>
<value>true</value>
</property>
</configuration>vim yarn-site.xml 中文记得删除
1
2
3
4
5
6
7
8
9
10
11
12
13
14
15
16
17
18
19
20
21
22
23
24
25
26
27
28
29
30
31
32
33
34
35
36
37
38
39
40
41
42
43
44
45
46
47
48
49
50
51
52
53
54
55
56
57
58
59
60
61
62<configuration>
<property>
<!--开启yarn高可用-->
<name>yarn.resourcemanager.ha.enabled</name>
<value>true</value>
</property>
<property>
<!-- 指定Yarn集群在zookeeper上注册的节点名-->
<name>yarn.resourcemanager.cluster-id</name>
<value>hayarn</value>
</property>
<property>
<!--指定两个resourcemanager的名称-->
<name>yarn.resourcemanager.ha.rm-ids</name>
<value>rm1,rm2</value>
</property>
<property>
<!--指定rm1的主机-->
<name>yarn.resourcemanager.hostname.rm1</name>
<value>ha02</value>
</property>
<property>
<!--指定rm2的主机-->
<name>yarn.resourcemanager.hostname.rm2</name>
<value>ha03</value>
</property>
<property>
<!--配置zookeeper的地址-->
<name>yarn.resourcemanager.zk-address</name>
<value>ha01:2181,ha02:2181,ha03:2181</value>
</property>
<property>
<!--开启yarn恢复机制-->
<name>yarn.resourcemanager.recovery.enabled</name>
<value>true</value>
</property>
<property>
<!--配置执行resourcemanager恢复机制实现类-->
<name>yarn.resourcemanager.store.class</name>
<value>org.apache.hadoop.yarn.server.resourcemanager.recovery.ZKRMStateStore</value>
</property>
<property>
<!--指定主resourcemanager的地址-->
<name>yarn.resourcemanager.hostname</name>
<value>ha03</value>
</property>
<property>
<!--nodemanager获取数据的方式-->
<name>yarn.nodemanager.aux-services</name>
<value>mapreduce_shuffle</value>
</property>
<property>
<!--开启日志聚集功能-->
<name>yarn.log-aggregation-enable</name>
<value>true</value>
</property>
<property>
<!--配置日志保留7天-->
<name>yarn.log-aggregation.retain-seconds</name>
<value>604800</value>
</property>
</configuration>vim slaves 改为
1
2
3ha01
ha02
ha03发送到其他两台机器中
1
2scp -r /opt/soft/hadoop260/ root@ha02:/opt/soft
scp -r /opt/soft/hadoop260/ root@ha03:/opt/soft好了以后,同时在三台设备中
1
2
3
4
5
6
7
8
9
10
11
12
13
14
15# vim /etc/profile
在最后加上
#hadoop
export HADOOP_HOME=/opt/soft/hadoop260
export HADOOP_MAPRED_HOME=$HADOOP_HOME
export HADOOP_COMMON_HOME=$HADOOP_HOME
export HADOOP_HDFS_HOME=$HADOOP_HOME
export YARN_HOME=$HADOOP_HOME
export HADOOP_COMMON_LIB_NATIVE_DIR=$HADOOP_HOME/lib/native
export PATH=$PATH:$HADOOP_HOME/sbin:$HADOOP_HOME/bin
export HADOOP_INSTALL=$HADOOP_HOME
# 保存退出
source /etc/profile
启动集群
启动zookeeper(3个都启动)(前面启动了就不用了)
1
zkServer.sh start
JournalNode(3个都启动)
1
2hadoop-daemon.sh start journalnode
# jps查看一下 多一个JournalNode格式化namenode(只在ha01主机上)
1
hdfs namenode -format
将ha01上的Namenode的元数据复制到ha02相同位置
这里面存储的是namenode的日志文件:fsimage_xxxx
1
scp -r /opt/soft/hadoop260/dfs/namenode_data/current/ root@ha02:/opt/soft/hadoop260/dfs/namenode_data
/opt/soft/hadoop260/dfs 中的edits是datanode的日志文件
在ha01或ha02格式化故障转移控制器zkfc(这边再ha01上)
1
hdfs zkfc -formatZK
在ha01上启动dfs服务
1
start-dfs.sh
在hd03上启动yarn服务(这都是之前配置好的)
1
start-yarn.sh
多了ResourceManager
都多了NodeManager
在hd01上启动history服务器(不一定要)
1
mr-jobhistory-daemon.sh start historyserver
多了JobHistoryServer
在hd02上启动resourcemanager服务
1
yarn-daemon.sh start resourcemanager
查看效果
ha01 http://192.168.179.141:50070/
检查集群情况
jps 上面服务不能缺少
查看状态
1
2
3
4
5
6# 在hd01上查看服务状态
hdfs haadmin -getServiceState nn1 #active
hdfs haadmin -getServiceState nn2 #standby
# 在hd03上查看resourcemanager状态
yarn rmadmin -getServiceState rm1 #standby
yarn rmadmin -getServiceState rm2 #active检查主备切换
1
2
3
4# kill 掉Namenode主节点 查看Namenode standby节点状态
kill -9 namenode主节点进程
# 恢复后重新加入
hadoop-daemon.sh start namenode #启动后也只是standby节点
集群关闭
1 | stop-all.sh |
集群二次启动
1 | #三个都启动 |
来个第二次开启的脚本
1 | #!/bin/sh |
三.HDFS
(一)介绍
1.HDFS副本机制
2.HDFS优缺点
- 优点
- 高容错性
- 适合大数据处理
- 可构建在廉价的机器上
- 缺点
- 不适合低延迟数据访问场景
- 不适合小文件存取场景
- 不适合并发写入,文件随机求改场景
3.HDFS写 文件
(二)使用
1.HDFS写 文件
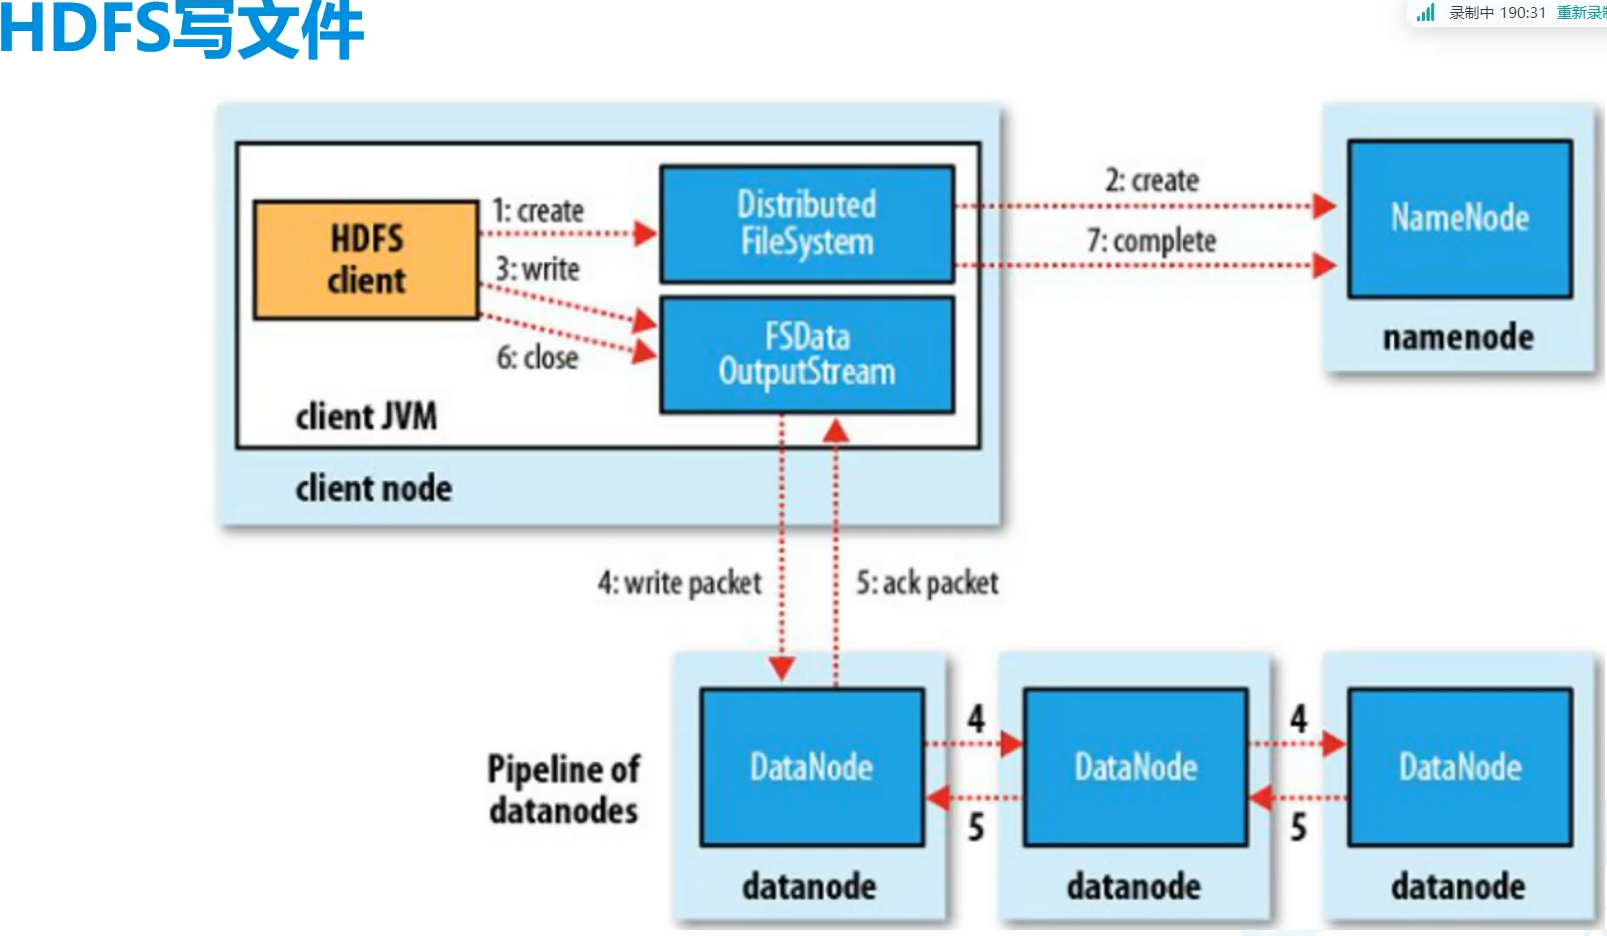
- client向namenode请求地址
- client拿着地址向yarn提出写入,提供地址
- yarn向datanode存入数据,返回相应的应答
- client收到应答后告诉向NameNode
2.HDFS读过程
四.Hadoop高可用集群
1.ZooKeeper
脑裂现象
这边就没这个现象,因为配好了
hadoop 1.x 2.x是要配置重选
3.x中ZooKeeper会在两个主机中选出一个新的
2.Hadoop
A.使用
查看效果
ha01 http://192.168.179.141:50070/
检查集群情况
jps 上面服务不能缺少
查看状态
1
2
3
4
5
6# 在hd01上查看服务状态
hdfs haadmin -getServiceState nn1 #active
hdfs haadmin -getServiceState nn2 #standby
# 在hd03上查看resourcemanager状态
yarn rmadmin -getServiceState rm1 #standby
yarn rmadmin -getServiceState rm2 #active检查主备切换
1
2
3
4# kill 掉Namenode主节点 查看Namenode standby节点状态
kill -9 namenode主节点进程
# 恢复后重新加入
hadoop-daemon.sh start namenode #启动后也只是standby节点
集群二次启动
1 | #三个都启动 |
- start-dfs.sh启动的是
- NameNode
- Secondary NameNode
- DataNode
- start-dfs.sh启动的是
- ResourceManager
- NodeManager
3.组成
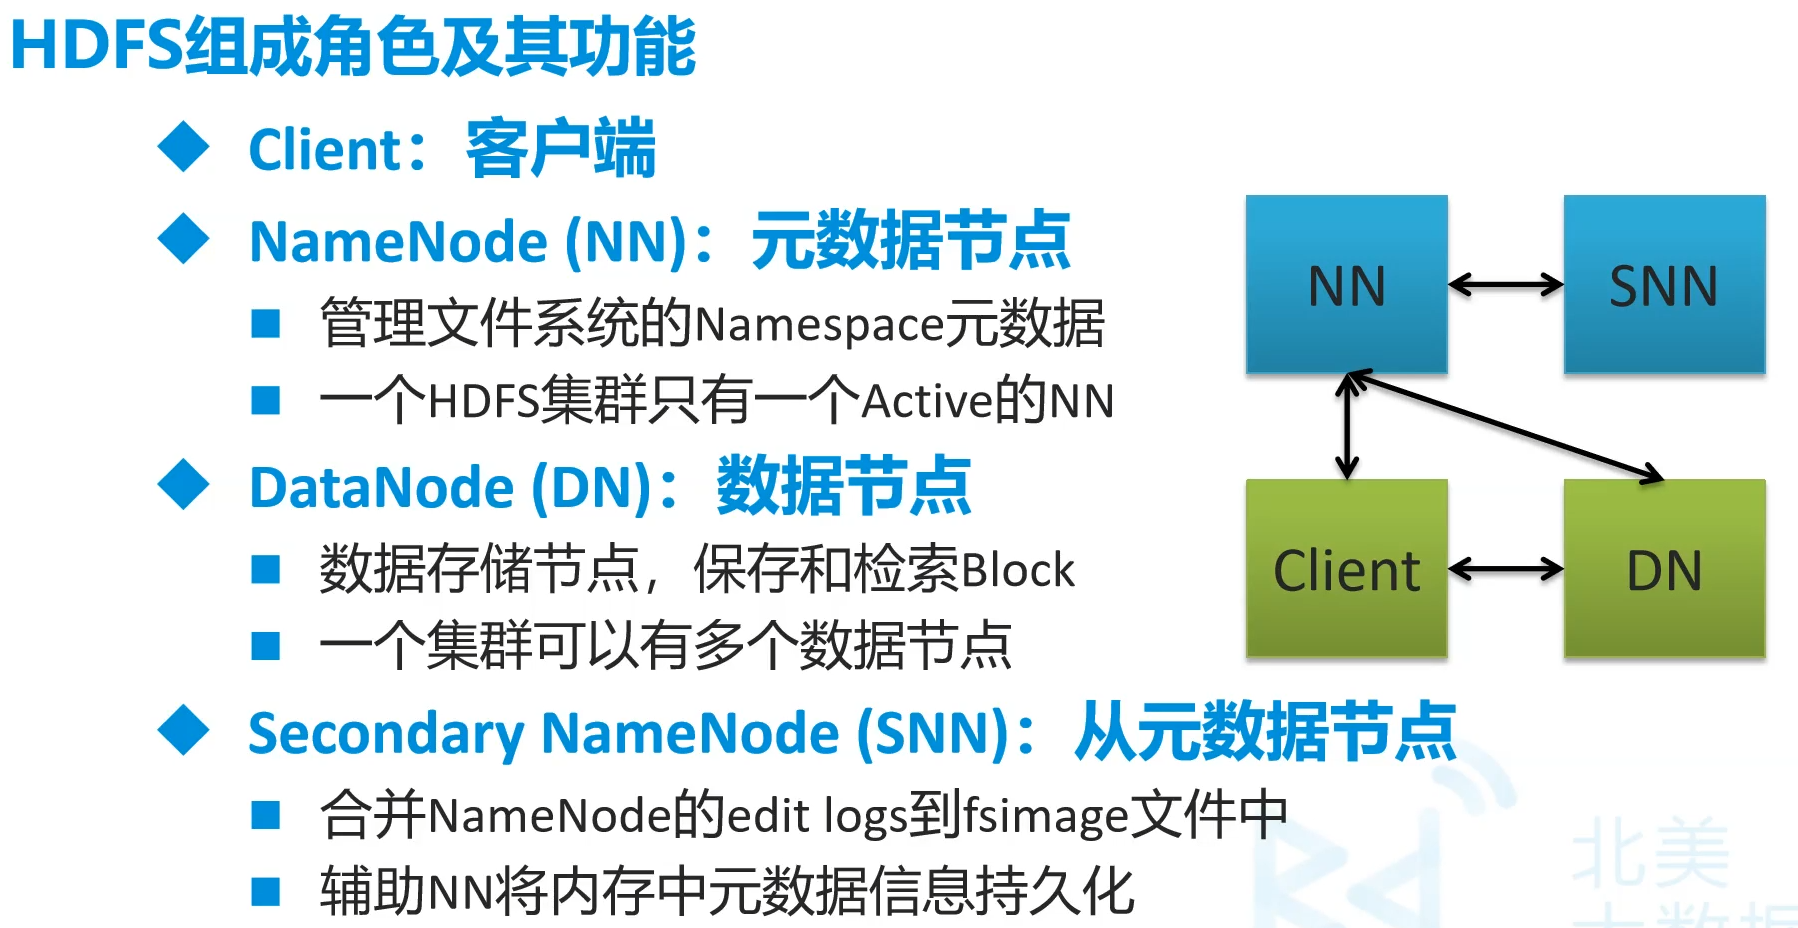
NameNode相当于DataNode的目录
client得到NameNode中的元数据在去找DN,而不是NN取找DN
NN挂掉了SNN并不会成为主节点,只能作辅助作用,NN失效了有备用NN而非SNN
/opt/soft/hadoop260/dfs/namenode_data/这里面存储的是namenode的日志文件:fsimage_xxxx
/opt/soft/hadoop260/dfs 中的edits是datanode的日志文件
seen_txid要统一
五.MapReduce
- 程序工程文件夹
java/mymr
(一)前期
针对大量数据进行计算、统计的引擎框架
数据少没有优势
真正的并行计算
一开始模拟数据调试
我们只要关心程序逻辑,不需要知道这么分布
-
分解+聚合
设计思想
不适用领域
- 难以实时计算
- 不适合(实时)流式计算
- 不适合DGA(有向图)计算
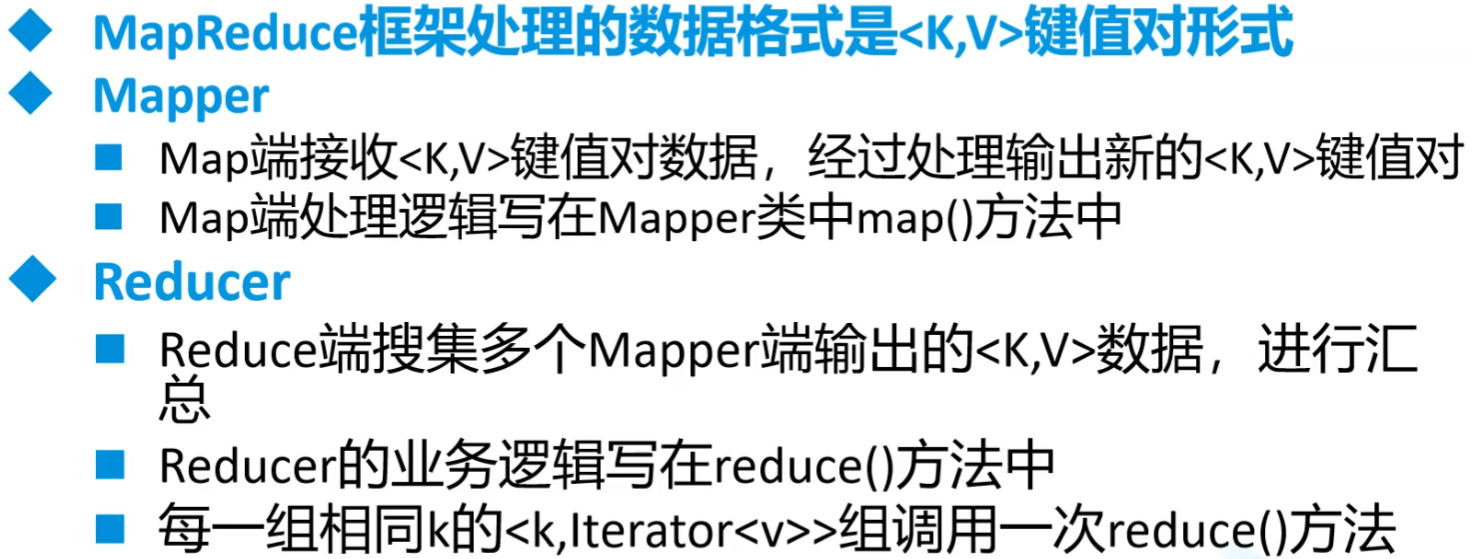
MapReduce编程规范
开启多reducer节点
1
2// 开启多个reduce任务
job.setNumReduceTasks(2);MapperJoin对于Mapper和Reducer的传递,
对于双表,比如用户和订单,对于大量订单和少量用户
可以把用户信息作为缓存放到订单服务器上,减少数据的拉取(本服务器上的就不用动了)
建议25MB以内的可以传递过来
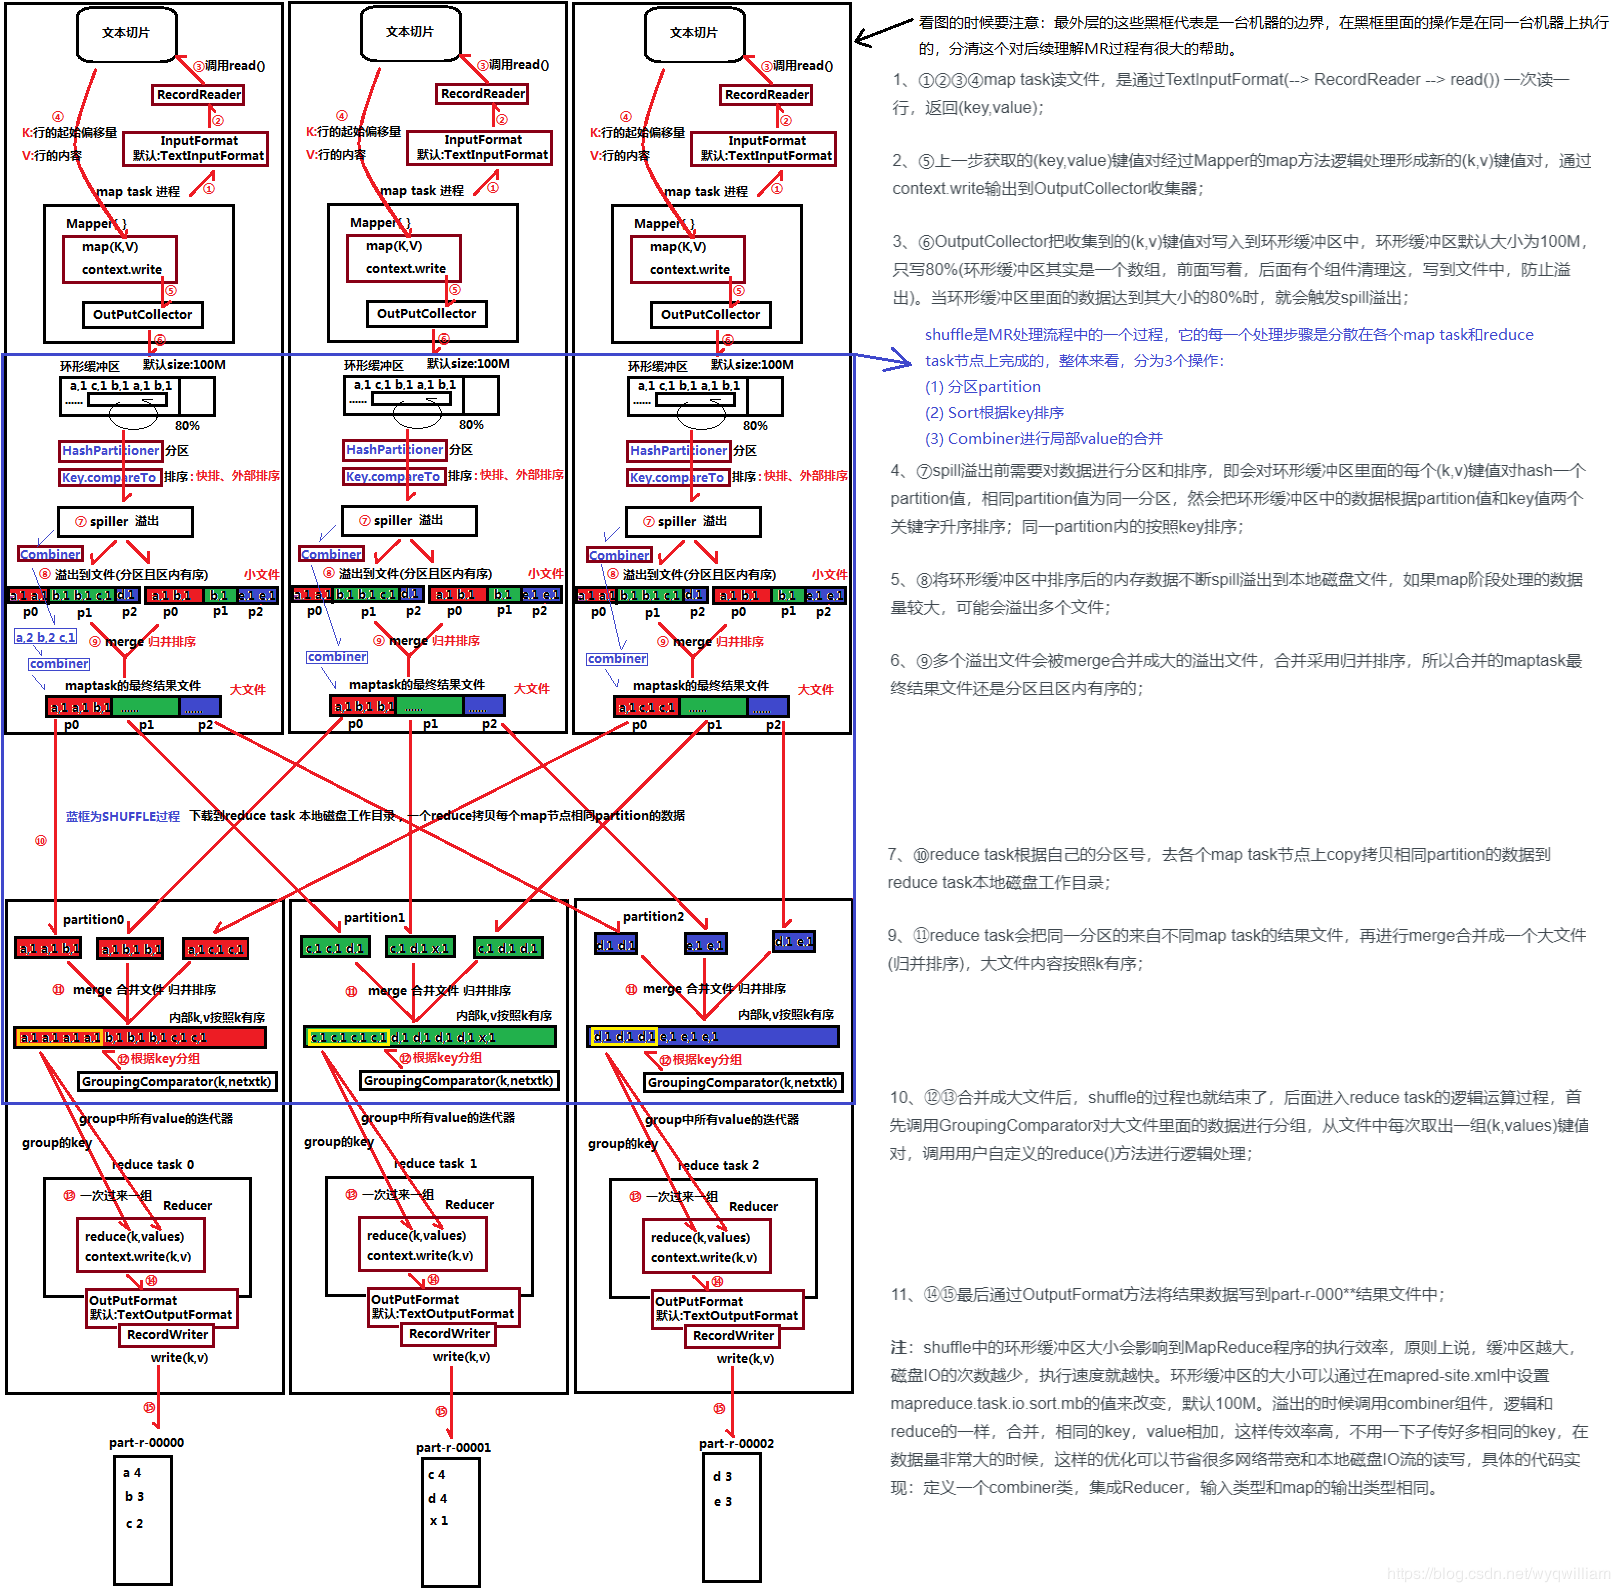
整体架构
过程
准备行读取器进行逻辑切片,切片过程可以由自己调整切片大小而计算切片数量。但是,由于不会真的直接在128M的地方一刀切,所以可能会出现较大的切片
切片结果,key行偏移量,v为行内容,切成了多少片就有多少mapper任务
提优:一千七八片的话,通过调整切片最大值最小值,将总数提到2000
1
2
3
4// 切片大小源码 blockSize默认128MB
protected long computeSplitSize(long blockSize, long minSize, long maxSize) {
return Math.max(minSize, Math.min(maxSize, blockSize));
}mapper处理
读取通过环状缓冲区来读入,用以节省内存,因为前面的切片过程由于不能从中截断会切出过大的片。单个maptask的内存无法直接处理这些数据,这个缓冲区大小为100M,满到80M时,等这条数据读完就溢出写入磁盘。
HashPartitioner分区,在溢出过程中。默认对key进行hash分区,实际可自定义,数量和reducer数量紧密相关
WritableComparator排序,在溢出过程中。默认对key进行ascii的排序,
Combiner进行局部合并,继承的也是Reducer。同时自动归并排序合并成大的内容,因为内部是由多个partition值的。combiner工作的位置和小文件聚合同时进行(这段是透明的),我们只要关combiner
再传到相应Reducer进行归并。对于是否要reduce,可以看我们需求是否要进行合并。然后是看文件的大小,太小的文件会使过程过于复杂影响效率。
FileInputFormat的过程中会获取前面的一系列参数
可以直接查看源码
然后再主类中可以加入这条
1
2
3
4job.getConfiguration().setLong("mapreduce.input.fileinputformat.split.minsize",10000L);
// 文件分割最小尺寸10kB一个,最好都是2的多少次方
job.getConfiguration().setLong("mapreduce.input.fileinputformat.split.maxsize",128000000L);
// 最大分割FileInputFormat继承InputFormat,里面有分割(getSplits)和读取(createRecordReader)两种要实现
分割的话确定好大小,会往后推直到找到相应符号(比如换行符)
读取默认是行读取器,因此默认Key为LongWritable类型
环状缓冲区
- 切片从头到尾找不到结束符、换行符等等 ,理论128M,但可能远超内存量
- 用于节省内存
- 100M用80M,利用类似于双指针法,双指针收尾相接则满,或者直接为0(都是取余的)就满


(二)Java程序1
一个文件中单词统计
程序结构
我们要管的就是Map和Reduce
combine和Shuffle之间会比较慢
Hadoop中需要对象比较的原因
Combine到Shuffle的步骤中,通过类似于哈希表的方式计算hash分配到各个服务器中。
1.pom.xml
1 | <properties> |
2.WordMapper.java
知识
这样的话要自己实现序列化
1
extends Mapper<Long,String,String,Integer>
用这个就会自动序列化
<keyin,valuein,keyout,vlueout>1
extends Mapper<LongWritable, Text,Text, IntWritable>
注意,Mapper第一个对于Hadoop而言一般都是LongWritable,都是自动分的行号
用
context.write来写入输出值,都要转为相应的格式
程序
1
2
3
4
5
6
7
8
9
10
11
12
13
14
15
16
17
18
19
20
21
22
23
24package com.njupt.mymr.firstmr;
import org.apache.hadoop.io.IntWritable;
import org.apache.hadoop.io.LongWritable;
import org.apache.hadoop.io.Text;
import org.apache.hadoop.mapreduce.Mapper;
import java.io.IOException;
/**
* 分解接收到的数据
*/
public class WordMapper extends Mapper<LongWritable, Text,Text, IntWritable> {
IntWritable one = new IntWritable(1);
protected void map(LongWritable key, Text value, Mapper<LongWritable, Text, Text, IntWritable>.Context context) throws IOException, InterruptedException {
// 将一行数据分割成单词
String[] words = value.toString().split(" ");
// 利用for循环向后传递(单词 1)
for (String word : words) {
context.write(new Text(word),one);//hello 1, ok 1,hello 1, hadoop 1
}
}
}解释
IntWritable one = new IntWritable(1);放外面节省空间
3.WordReduce.java
知识
- 用
context.write来写入输出值,都要转为相应的格式
- 用
程序
1
2
3
4
5
6
7
8
9
10
11
12
13
14
15
16
17
18
19
20
21
22
23
24
25
26package com.njupt.mymr.firstmr;
import org.apache.hadoop.io.IntWritable;
import org.apache.hadoop.io.Text;
import org.apache.hadoop.mapreduce.Reducer;
import java.io.IOException;
/**
* 聚合统计
*/
public class WordReducer extends Reducer<Text, IntWritable, Text, IntWritable> {
// hello [1,1]
protected void reduce(Text key, Iterable<IntWritable> values, Reducer<Text, IntWritable, Text, IntWritable>.Context context) throws IOException, InterruptedException {
// 统计数组中有多少数字进行相加
int cnt = 0;
for (IntWritable iw : values) {
// cnt+=iw.get();
cnt++;
}
// 将统计的结果存放到文件中
context.write(key, new IntWritable(cnt));
}
}解释
- 可以看到reduce方法第二个参数为迭代器,是因为值其实是多个聚合的数组,具体参考图片的Shuffle阶段
4.main
知识
包要搞对
FileInputFormat和FileOutputFormat用长的那个包lib的
程序
1
2
3
4
5
6
7
8
9
10
11
12
13
14
15
16
17
18
19
20
21
22
23
24
25
26
27
28
29
30
31
32
33
34
35
36
37
38
39
40
41package com.njupt.mymr.firstmr;
import org.apache.hadoop.conf.Configuration;
import org.apache.hadoop.fs.Path;
import org.apache.hadoop.io.IntWritable;
import org.apache.hadoop.io.Text;
import org.apache.hadoop.mapreduce.Job;
import org.apache.hadoop.mapreduce.lib.input.FileInputFormat;
import org.apache.hadoop.mapreduce.lib.output.FileOutputFormat;
/**
* 调用MapReduce框架运行我写的mapper和reducer业务
*/
public class WordApp {
public static void main(String[] args) throws Exception{
// 开启配置环境
Configuration conf = new Configuration();
// 开启任务
Job job = Job.getInstance(conf);
// 设置程序的引导类
job.setJarByClass(WordApp.class);
// 设置mapper任务
job.setMapperClass(WordMapper.class);
// 设置mapper任务的输出类型
job.setMapOutputKeyClass(Text.class);
job.setMapOutputValueClass(IntWritable.class);
// 设置reducer任务
job.setReducerClass(WordReducer.class);
// 设置reducer任务的输出类
job.setOutputKeyClass(Text.class);
job.setOutputValueClass(IntWritable.class);
// 设置文件读取路径 FileInputFormat用长的那个包lib的
FileInputFormat.setInputPaths(job,new Path("E:\\ProgramFile\\BigDataStudy\\data\\word.txt"));
// 设置统计结果的输出路径 FileOutputFormat用长的那个包lib的 这个文件夹不能存在
FileOutputFormat.setOutputPath(job,new Path("E:\\ProgramFile\\BigDataStudy\\data\\wordresult"));
//启动程序
job.waitForCompletion(true);
}
}解释
执行后会出错,空指针异常
因为windows下没hadoop环境,要配置环境
windows下hadoop环境伪造
把hadoop的压缩包找到一个地方解压(只要用里面的库)
把winutils.exe放在bin文件夹中
hadoop.dll放到c:/Windows/System32中
环境变量
新建一个HADOOP_HOME 值为hadoop文件路径
在Path中新加一条%HADOOP_HOME%\bin
重启一下idea
(三)Hadoop手动序列化
序列化和反序列化都要写,要对应好
Hadoop中的变量都要是序列化的,比如Text、IntWritable、LongWritable
如果不用这个,就需要我们手动的去序列化
全部手写
一定要接入
Serializable接口1
2
3
4
5
6
7
8
9
10
11
12
13
14
15
16
17
18
19
20
21
22
23
24
25
26
27
28
29
30
31
32
33
34public class Student implements Serializable {
private String stuname;
private int age;
private int chinese;
private int math;
private int english;
// 有参构造、无参构造、get、set
}
/**
* 序列化
*/
public class Demo {
public static void main(String[] args) throws Exception {
Student st = new Student("zs", 20, 88, 90, 95);
// 这个里面是文件
ObjectOutputStream oos = new ObjectOutputStream(new FileOutputStream("e:/Temp/aabbcc"));
oos.writeObject(st);
oos.close();
}
}
/**
* 反序列化
*/
public class Demo {
public static void main(String[] args) throws Exception {
ObjectInputStream ois = new ObjectInputStream(new FileInputStream("e:/Temp/aabbcc"));
Student stu = (Student) ois.readObject();
ois.close();
System.out.println(stu.getStuname()+"..."+stu.getAge());
}
}MapReduce提供自动序列化与比较
WritableComparable<T>写就是序列化,读就是反序列化
1
2
3
4
5
6
7
8
9
10
11
12
13
14
15
16
17
18
19
20
21
22
23
24
25
26
27
28
29
30
31
32
33
34public class Student implements WritableComparable<Student> {
private String stuname;
private int age;
private int chinese;
private int math;
private int english;
// 比较
public int compareTo(Student o) {
return 0;
}
// 序列化
public void write(DataOutput dataOutput) throws IOException {
// 顺序不能乱,要和属性顺序一模一样
dataOutput.writeUTF(stuname);
dataOutput.writeInt(age);
dataOutput.writeInt(chinese);
dataOutput.writeInt(math);
dataOutput.writeInt(english);
}
// 反序列化
public void readFields(DataInput dataInput) throws IOException {
this.stuname=dataInput.readUTF();
this.age = dataInput.readInt();
this.chinese = dataInput.readInt();
this.math = dataInput.readInt();
this.english = dataInput.readInt();
}
}
(四)Java程序2
学生成绩行转列
程序
1
2
3
4
5
6
7
8
9
10
11
12
13
14
15
16
17
18
19
20
21
22
23
24
25
26
27
28
29
30
31
32
33
34
35
36
37
38
39
40
41
42
43
44
45
46
47
48
49
50
51
52
53
54
55
56
57
58
59
60
61
62
63
64
65
66
67
68
69
70
71
72
73
74
75
76
77
78
79
80
81
82
83
84
85
86
87
88
89
90
91
92
93
94
95
96
97
98
99
100
101
102
103/**
* 实体类
*/
public class Student implements WritableComparable<Student> {
private String stuname;
private int age;
private int chinese;
private int math;
private int english;
public int compareTo(Student o) {
return 0;
}
public void write(DataOutput dataOutput) throws IOException {
// 顺序不能乱,要和属性顺序一模一样
dataOutput.writeUTF(stuname);
dataOutput.writeInt(age);
dataOutput.writeInt(chinese);
dataOutput.writeInt(math);
dataOutput.writeInt(english);
}
public void readFields(DataInput dataInput) throws IOException {
this.stuname=dataInput.readUTF();
this.age = dataInput.readInt();
this.chinese = dataInput.readInt();
this.math = dataInput.readInt();
this.english = dataInput.readInt();
}
// 要有set get toString
}
public class StudentMapper extends Mapper<LongWritable, Text,Text,Student> {
protected void map(LongWritable key, Text value, Mapper<LongWritable, Text, Text, Student>.Context context) throws IOException, InterruptedException {
String[] infos = value.toString().split(",");
Student stu = new Student();
stu.setStuname(infos[1]);
stu.setAge(Integer.parseInt(infos[2]));
if (infos[3].equalsIgnoreCase("chinese")) {
stu.setChinese(Integer.parseInt(infos[4]));
} else if (infos[3].equalsIgnoreCase("math")) {
stu.setMath(Integer.parseInt(infos[4]));
} else {
stu.setEnglish(Integer.parseInt(infos[4]));
}
context.write(new Text(stu.getStuname()),stu);
}
}
public class StudentReducer extends Reducer<Text, Student, Text, NullWritable> {
protected void reduce(Text key, Iterable<Student> values, Reducer<Text, Student, Text, NullWritable>.Context context) throws IOException, InterruptedException {
int[] scores = new int[3];
for (Student st : values) {
if (st.getChinese() != 0) {
scores[0]=st.getChinese();
} else if (st.getMath() != 0) {
scores[1] = st.getMath();
} else {
scores[2] = st.getEnglish();
}
}
context.write(new Text(key+" "+ Arrays.toString(scores)),NullWritable.get());
}
}
public class StudentApp {
public static void main(String[] args) throws Exception{
// 开启配置环境
Configuration conf = new Configuration();
// 开启任务
Job job = Job.getInstance(conf);
// 设置程序的引导类
job.setJarByClass(StudentApp.class);
// 设置mapper任务
job.setMapperClass(StudentMapper.class);
// 设置mapper任务的输出类型
job.setMapOutputKeyClass(Text.class);
job.setMapOutputValueClass(Student.class);
// 设置reducer任务
job.setReducerClass(StudentReducer.class);
// 设置reducer任务的输出类
job.setOutputKeyClass(Text.class);
job.setOutputValueClass(NullWritable.class);
// 设置文件读取路径 FileInputFormat用长的那个包lib的
FileInputFormat.setInputPaths(job,new Path("E:\\ProgramFile\\BigDataStudy\\data\\stu.csv"));
// 设置统计结果的输出路径 FileOutputFormat用长的那个包lib的
FileOutputFormat.setOutputPath(job,new Path("E:\\ProgramFile\\BigDataStudy\\data\\sturesult"));
//启动程序
job.waitForCompletion(true);
}
}程序解释
不要某个输出可以用
NullWritable最后要用
NullWritable.get()来交付一个空值自己的类就一定要序列化才能再mapper和reducer里用
程序效果
1
2
3
4
5
61,zs,20,chinese,56
2,zs,20,math,35
3,zs,20,english,33
4,ls,21,chinese,48
5,ls,21,math,77
6,ls,21,english,531
2ls [48, 77, 53]
zs [56, 35, 33]
(五)Java程序3#
双表查询的内联
用户和用户订单
1
2
31,张三,23
2,李四,534
3,王五,2341
2
3
41,1,苹果,30
2,2,栗子,40
3,3,西瓜,15
4,3,火龙果,80mapper进来的时候,是单纯的上下拼接,一开始进来的key是行数
程序
1
2
3
4
5
6
7
8
9
10
11
12
13
14
15
16
17
18
19
20
21
22
23
24
25
26
27
28
29
30
31
32
33
34
35
36
37
38
39
40
41
42
43
44
45
46
47
48
49
50
51
52
53
54
55
56
57
58
59
60
61
62
63
64
65
66
67
68
69
70
71
72
73
74
75
76
77
78
79
80
81
82
83
84
85
86
87
88
89
90
91
92
93
94
95
96
97
98
99
100
101
102
103
104
105
106
107
108
109
110
111
112
113
114
115
116
117
118
119
120
121
122
123
124
125
126
127
128
129
130
131
132
133
134
135
136
137
138
139
140
141
142
143
144
145
146
147
148
149
150
151
152
153
154
155
156
157
158
159
160
161
162public class CustOrder implements WritableComparable<CustOrder>,Cloneable {
private int custid;
private String custname="";
private int age;
private int ordid;
private String goodname="";
private double price;
public CustOrder clone() throws CloneNotSupportedException {
return (CustOrder)super.clone();
}
public int compareTo(CustOrder o) {
return 0;
}
public void write(DataOutput dataOutput) throws IOException {
dataOutput.writeInt(custid);
dataOutput.writeUTF(custname);
dataOutput.writeInt(age);
dataOutput.writeInt(ordid);
dataOutput.writeUTF(goodname);
dataOutput.writeDouble(price);
}
public void readFields(DataInput dataInput) throws IOException {
this.custid=dataInput.readInt();
this.custname=dataInput.readUTF();
this.age=dataInput.readInt();
this.ordid=dataInput.readInt();
this.goodname=dataInput.readUTF();
this.price=dataInput.readDouble();
}
// toString get set省略
}
/**
* 这边按照用户id单纯分一下组
*/
public class CustOrderMapper extends Mapper<LongWritable, Text, IntWritable,CustOrder> {
protected void map(LongWritable key, Text value, Mapper<LongWritable, Text, IntWritable, CustOrder>.Context context) throws IOException, InterruptedException {
// 分割字符串
String[] infos = value.toString().split(",");
CustOrder co = new CustOrder();
// 判断本条数据传入的是用户还是订单
if (infos.length == 3) {
// 传入的是一个用户数据
co.setCustid(Integer.parseInt(infos[0]));
co.setCustname(infos[1]);
co.setAge(Integer.parseInt(infos[2]));
} else {
// 传入的是一个订单数据
co.setOrdid(Integer.parseInt(infos[0]));
co.setCustid(Integer.parseInt(infos[1]));
co.setGoodname(infos[2]);
co.setPrice(Double.parseDouble(infos[3]));
}
context.write(new IntWritable(co.getCustid()),co);
}
}
public class CustOrderReducer extends Reducer<IntWritable,CustOrder, Text, NullWritable> {
protected void reduce(IntWritable key, Iterable<CustOrder> values, Reducer<IntWritable, CustOrder, Text, NullWritable>.Context context) throws IOException, InterruptedException {
// 将迭代器转集合
List<CustOrder> groupLst = new ArrayList<>();
for (CustOrder cu : values) {
try {
groupLst.add(cu.clone());
} catch (CloneNotSupportedException e) {
e.printStackTrace();
}
}
// for (CustOrder cu : values) {
// groupLst.add(cu);
// }
// 找到用户对象信息
CustOrder cust = new CustOrder();
for (CustOrder co:groupLst){
if (!co.getCustname().equals("")) { // 要用equals否则会出错
cust.setCustid(co.getCustid());
cust.setCustname(co.getCustname());
cust.setAge(co.getAge());
groupLst.remove(co);
break;
}
}
// 关联数据发送到mr上下文
for (CustOrder cos : groupLst) {
// 将订单信息和用户信息关联起来
cust.setOrdid(cos.getOrdid());
cust.setGoodname(cos.getGoodname());
cust.setPrice(cos.getPrice());
// 将本数据发送上下文
context.write(new Text(cust.toString()),NullWritable.get());
}
}
}
public class CustOrderApp {
// 递归删除一个文件夹
public static void deleteDirectory(File dir) {
File[] files = dir.listFiles();
if (files != null) { //some JVM implementations may return null for empty dirs
for (File file : files) {
if (file.isDirectory()) {
// Recursive call
deleteDirectory(file);
} else {
// Delete the file
file.delete();
}
}
}
// The directory is now empty so now it can be deleted
dir.delete();
}
public static void main(String[] args) throws Exception{
// 开启配置环境
Configuration conf = new Configuration();
// 开启任务
Job job = Job.getInstance(conf);
// 设置程序的引导类
job.setJarByClass(CustOrderApp.class);
// 设置mapper任务
job.setMapperClass(CustOrderMapper.class);
// 设置mapper任务的输出类型
job.setMapOutputKeyClass(IntWritable.class);
job.setMapOutputValueClass(CustOrder.class);
// 设置reducer任务
job.setReducerClass(CustOrderReducer.class);
// 设置reducer任务的输出类
job.setOutputKeyClass(Text.class);
job.setOutputValueClass(NullWritable.class);
//有这个文件就删了
File fi = new File("E:\\ProgramFile\\BigDataStudy\\data\\mymr\\custorderresult");
if(fi.exists()){
new CustOrderApp().deleteDirectory(fi);
}
// 设置文件读取路径 FileInputFormat用长的那个包lib的
FileInputFormat.setInputPaths(job,new Path("E:\\ProgramFile\\BigDataStudy\\data\\mymr\\custorder"));
// 设置统计结果的输出路径 FileOutputFormat用长的那个包lib的
FileOutputFormat.setOutputPath(job,new Path("E:\\ProgramFile\\BigDataStudy\\data\\mymr\\custorderresult"));
//启动程序
job.waitForCompletion(true);
}解释
空不能序列化,所以实体类中可以写个””初始化
要小心对象的传入与删除,往往会导致空指针
比如CustOrderReducer中,每次cu地址相同,会导致指向的空间一致,所以导致groupLst中的内容全部相同(这边的values是
Iterable<CustOrder> values)1
2
3
4List<CustOrder> groupLst = new ArrayList<>();
for (CustOrder cu : values) {
groupLst.add(cu);
}那么有几种解决方法
新建一个CustOrder对象,逐个属性复制过去,
groupLst.add(新对象)再CustOrder里面实现clone(),
groupLst.add(cu.clone())实例对象要实现Cloneable接口才可以让clone()用public
1
2
3
4
5
6
7
8
9
10
11
12
13
14
15
16
17
18
19
20
21
22
23
24
25public class CustOrder implements WritableComparable<CustOrder>,Cloneable {
// .....
public CustOrder clone() throws CloneNotSupportedException {
return (CustOrder)super.clone();
}
// .....
}
public class CustOrderReducer extends Reducer<IntWritable,CustOrder, Text, NullWritable> {
protected void reduce(IntWritable key, Iterable<CustOrder> values, Reducer<IntWritable, CustOrder, Text, NullWritable>.Context context) throws IOException, InterruptedException {
// 将迭代器转集合
List<CustOrder> groupLst = new ArrayList<>();
for (CustOrder cu : values) {
try {
groupLst.add(cu.clone());
} catch (CloneNotSupportedException e) {
e.printStackTrace();
}
// ....
}
//.....
}
}找不到其他的了/(ㄒoㄒ)/~~
开启多reducer节点
1
2// 开启多个reduce任务
job.setNumReduceTasks(2);
结果
1
2
3
4CustOrder{custid=1, custname='张三', age=23, ordid=1, goodname='苹果', price=30.0}
CustOrder{custid=2, custname='李四', age=534, ordid=2, goodname='栗子', price=40.0}
CustOrder{custid=3, custname='王五', age=234, ordid=4, goodname='火龙果', price=80.0}
CustOrder{custid=3, custname='王五', age=234, ordid=3, goodname='西瓜', price=15.0}
(六)Java程序4 MapJoin
少量数据的如用户,和大量数据的如订单,少量数据要小于25MB
Reduce根本不用,只用Mapper,Mapper兼具了Reducer的功能。ReduceJoin是在Reducer中进行表关联
少量数据直接放到服务器的缓存中,在mapper阶段关联
1
2// 将用户文件(小于25M)存放到缓存中
job.addCacheFile(new File("E:\\ProgramFile\\BigDataStudy\\data\\mymr\\custorder\\custs.csv").toURI());在mapper中要初始化setup加入缓存
URI[] uris = context.getCacheFiles();程序
1
2
3
4
5
6
7
8
9
10
11
12
13
14
15
16
17
18
19
20
21
22
23
24
25
26
27
28
29
30
31
32
33
34
35
36
37
38
39
40
41
42
43
44
45
46
47
48
49
50
51
52
53
54
55
56
57
58
59
60
61
62
63
64
65
66
67
68
69
70
71
72
73
74
75
76
77
78
79
80
81
82
83
84
85
86
87
88
89
90
91
92
93
94
95
96
97public class CO implements WritableComparable<CustOrder>,Cloneable {
private int custid;
private String custname="";
private int age;
private int ordid;
private String goodname="";
private double price;
public CustOrder clone() throws CloneNotSupportedException {
return (CustOrder)super.clone();
}
public int compareTo(CustOrder o) {
return 0;
}
public void write(DataOutput dataOutput) throws IOException {
dataOutput.writeInt(custid);
dataOutput.writeUTF(custname);
dataOutput.writeInt(age);
dataOutput.writeInt(ordid);
dataOutput.writeUTF(goodname);
dataOutput.writeDouble(price);
}
public void readFields(DataInput dataInput) throws IOException {
this.custid=dataInput.readInt();
this.custname=dataInput.readUTF();
this.age=dataInput.readInt();
this.ordid=dataInput.readInt();
this.goodname=dataInput.readUTF();
this.price=dataInput.readDouble();
}
// set get toString
}
public class COMapper extends Mapper<LongWritable, Text,Text, NullWritable> {
// 作为缓存
Map<String,String> cache = new HashMap<>();
// 服务器启动时运行一次
protected void setup(Mapper<LongWritable, Text, Text, NullWritable>.Context context) throws IOException, InterruptedException {
// 读缓存中的cust文件 设置相应的数据结构 存放到全局变量中
URI[] uris = context.getCacheFiles();
if (uris != null && uris.length > 0) {
// 获取缓存文件路径
String path = uris[0].getPath();
// 读文件
BufferedReader br = new BufferedReader(new FileReader(path));
String line = "";
while ((line = br.readLine()) != null) {
String[] infos = line.split(",");
cache.put(infos[0],line);
}
br.close();
}
}
protected void map(LongWritable key, Text value, Mapper<LongWritable, Text, Text, NullWritable>.Context context) throws IOException, InterruptedException {
// 获得到的是Order的数据1,1,苹果,30
String[] infos = value.toString().split(",");
String user = cache.get(infos[1]);
context.write(new Text(user+","+value.toString()),NullWritable.get());
}
}
public class COApp {
public static void main(String[] args) throws Exception{
// 开启配置环境
Configuration conf = new Configuration();
// 开启任务
Job job = Job.getInstance(conf);
// 设置程序的引导类
job.setJarByClass(COApp.class);
// 将用户文件(小于25M)存放到缓存中
job.addCacheFile(new File("E:\\ProgramFile\\BigDataStudy\\data\\mymr\\custorder\\custs.csv").toURI());
// 设置mapper任务
job.setMapperClass(COMapper.class);
// 设置mapper任务的输出类型
job.setMapOutputKeyClass(Text.class);
job.setMapOutputValueClass(NullWritable.class);
// 设置文件读取路径 FileInputFormat用长的那个包lib的
FileInputFormat.setInputPaths(job,new Path("E:\\ProgramFile\\BigDataStudy\\data\\mymr\\custorder\\orders.csv"));
// 设置统计结果的输出路径 FileOutputFormat用长的那个包lib的
FileOutputFormat.setOutputPath(job,new Path("E:\\ProgramFile\\BigDataStudy\\data\\mymr\\custorderresult"));
//启动程序
job.waitForCompletion(true);
}
}
(六)Java程序4
MapReduce中所有内容都可以自定义
这边来自定义中间的分组Partition部分,原生的是用hash进行分配reducer,可以自定义分配,这边是按照张、李、其他分
- 自己的类
extends Partitioner<T1,T2>mapper的outkey和outvalue
返回的0、1、2就是放进哪个文件中
- 主类中要有对应的Reducer数量即为分组数量,然后定义使用自定义分区
1
2
3
4
5// 开启多个reduce任务
job.setNumReduceTasks(3);
// 使用自定义分区
job.setPartitionerClass(MyPartitioner.class);- 自己的类
自定义排序Order部分,默认按键排序,自己重写也按键,但是可以把要排序的一起放到键中。这边按年龄排序
两个参数就是两个键,return按照-1 0 1来排大小,如果是整数可以直接用
Integer.compare(para1,para2)里面其实有很多接口的方法,这边只是其中一个
在主类中要加上如下语句
1
2// 设置reducer任务
job.setReducerClass(CustOrderReducer.class);
自定义Combiner部分,比如要聚合的时候算这个姓人的平均值
虽然实现的是Reducer,但要和Mapper的输出结果保持一致
extends Reducer<mapperOutKey, mapperOutValue,mapperOutKey, mapperOutValue>也可以做排序,但是不是在整个组中,而是在相同的键中排序
在主类中要加入如下语句
1
2// 设置combiner
job.setCombinerClass(PartCombiner.class);
多出的东西
- 原本数据
1 | 张三,20 |
程序
1
2
3
4
5
6
7
8
9
10
11
12
13
14
15
16
17
18
19
20
21
22
23
24
25
26
27
28
29
30
31
32
33
34
35
36
37
38
39
40
41
42
43
44
45
46
47
48
49
50
51
52
53
54
55
56
57
58
59
60
61
62
63
64
65
66
67
68
69
70
71
72
73
74
75
76
77
78
79
80
81
82
83
84
85
86
87
88
89
90
91
92
93
94
95
96
97
98
99
100
101
102
103
104
105
106
107
108public class PartMapper extends Mapper<LongWritable, Text,Text, Text> {
protected void map(LongWritable key, Text value, Mapper<LongWritable, Text, Text,Text>.Context context) throws IOException, InterruptedException {
// 分割数据
String name = value.toString().substring(0, 1);
// String[] infos = value.toString().split(",");
context.write(new Text(name),value);
}
}
public class MyPartitioner extends Partitioner<Text, Text> {
public int getPartition(Text text, Text text2, int i) {
String name = text.toString();
if(name.equals("张")){
return 0;
} else if (name.equals("李")) {
return 1;
}else{
return 2;
}
}
}
public class PartSortComparator extends WritableComparator {
public PartSortComparator() {
super(Text.class,true);
}
public int compare(WritableComparable a, WritableComparable b) {
Text user1 = (Text)a; // a、b都是前面传过来的键
Text user2 = (Text)b;
int user1Age = Integer.parseInt(user1.toString().split(",")[1]);
int user2Age = Integer.parseInt(user2.toString().split(",")[1]);
return Integer.compare(user1Age, user2Age);
}
}
public class PartCombiner extends Reducer<Text, Text,Text,Text> {
protected void reduce(Text key, Iterable<Text> values, Reducer<Text, Text, Text, Text>.Context context) throws IOException, InterruptedException {
// 填充数据到集合
List<String> strlst = new ArrayList<>();
for (Text user : values) {
strlst.add(user.toString());
}
// 计算所有人年龄的平均值
int cnt = 0;
for (String us : strlst) {
cnt+=Integer.parseInt(us.split(",")[1]);
}
cnt = cnt / strlst.size();
// 对string集合进行排队
Object[] obj = strlst.stream().sorted(new Comparator<String>() {
public int compare(String o1, String o2) {
int age1 = Integer.parseInt(o1.split(",")[1]);
int age2 = Integer.parseInt(o2.split(",")[1]);
return Integer.compare(age1, age2);
}
}).toArray();
// 输出数据
for (Object ob : obj) {
context.write(new Text(ob.toString()+",avg="+cnt),new Text(""));
}
}
}
public class PartApp {
public static void main(String[] args) throws Exception{
// 开启配置环境
Configuration conf = new Configuration();
// 开启任务
Job job = Job.getInstance(conf);
// 设置程序的引导类
job.setJarByClass(PartApp.class);
// 设置mapper任务
job.setMapperClass(PartMapper.class);
// 设置mapper任务的输出类型
job.setMapOutputKeyClass(Text.class);
job.setMapOutputValueClass(Text.class);
// 开启多个reduce任务
job.setNumReduceTasks(3);
// 使用自定义分区
job.setPartitionerClass(MyPartitioner.class);
// // 设置Mapper中的数据排序
// job.setSortComparatorClass(PartSortComparator.class);
// 设置combiner
job.setCombinerClass(PartCombiner.class);
// 设置文件读取路径 FileInputFormat用长的那个包lib的
FileInputFormat.setInputPaths(job,new Path("E:\\ProgramFile\\BigDataStudy\\data\\mymr\\users.csv"));
// 设置统计结果的输出路径 FileOutputFormat用长的那个包lib的
FileOutputFormat.setOutputPath(job,new Path("E:\\ProgramFile\\BigDataStudy\\data\\mymr\\custorderresult"));
//启动程序
job.waitForCompletion(true);
}
}最终结果
part-r-00000
1
2
3张无忌,18,avg=39
张三,20,avg=39
张三丰,80,avg=39part-r-00001
1
2
3李显龙,24,avg=34
李四,30,avg=34
李四光,50,avg=34part-r-00002
可以看到,不同姓(键)下的并没有升序排序
1
2王五,60,avg=60
赵六,56,avg=56
六.Yarn
(一)前期
分布式资源调度管理框架
(Yet Another Resource Negotiator)
历史
1.x中没有,mapreduce自己调度
2.x中开始出现
(二)Yarn内容
1.基本架构核心组件总体
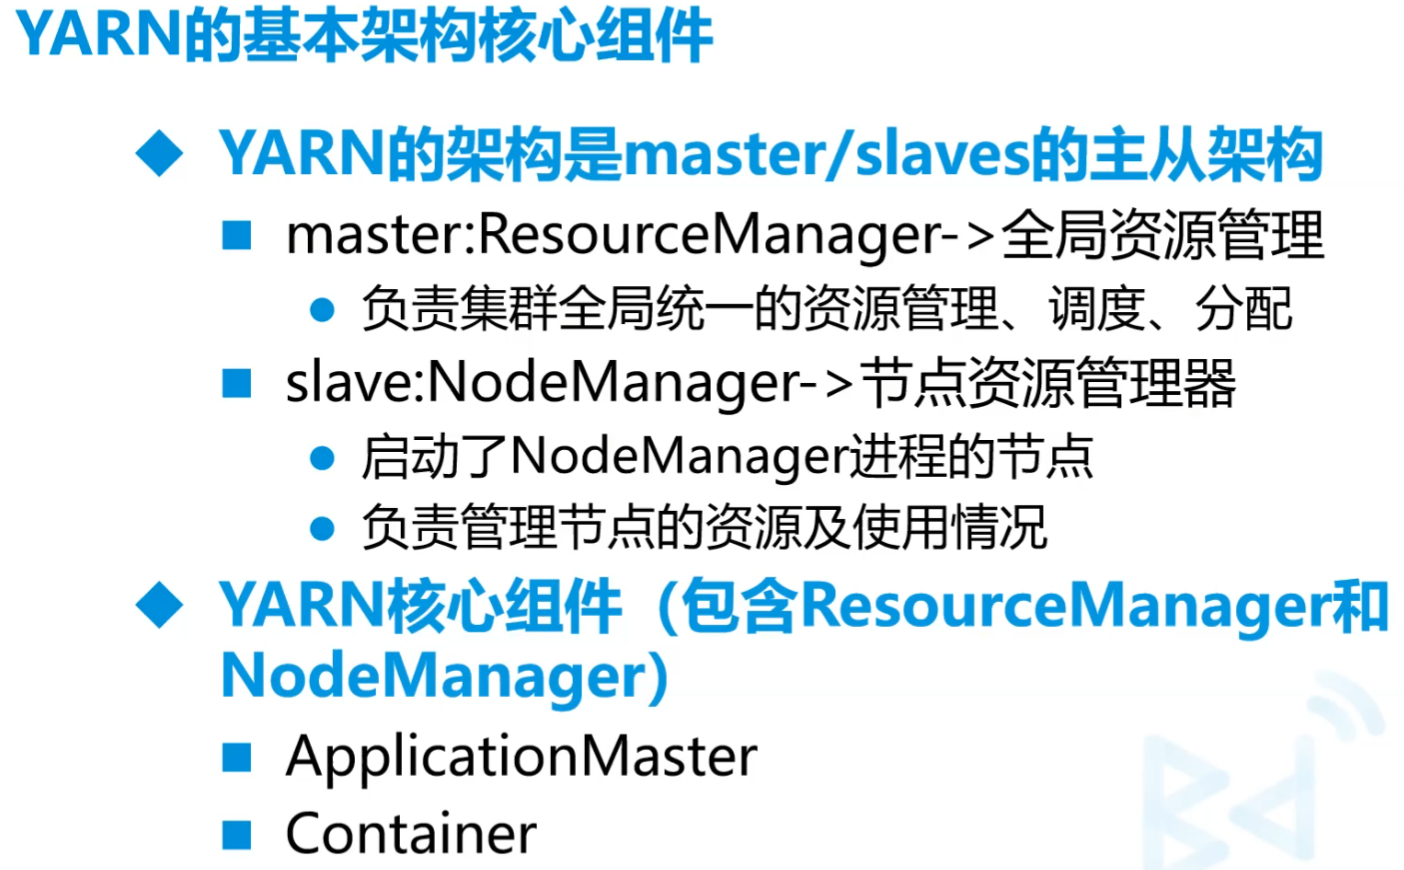
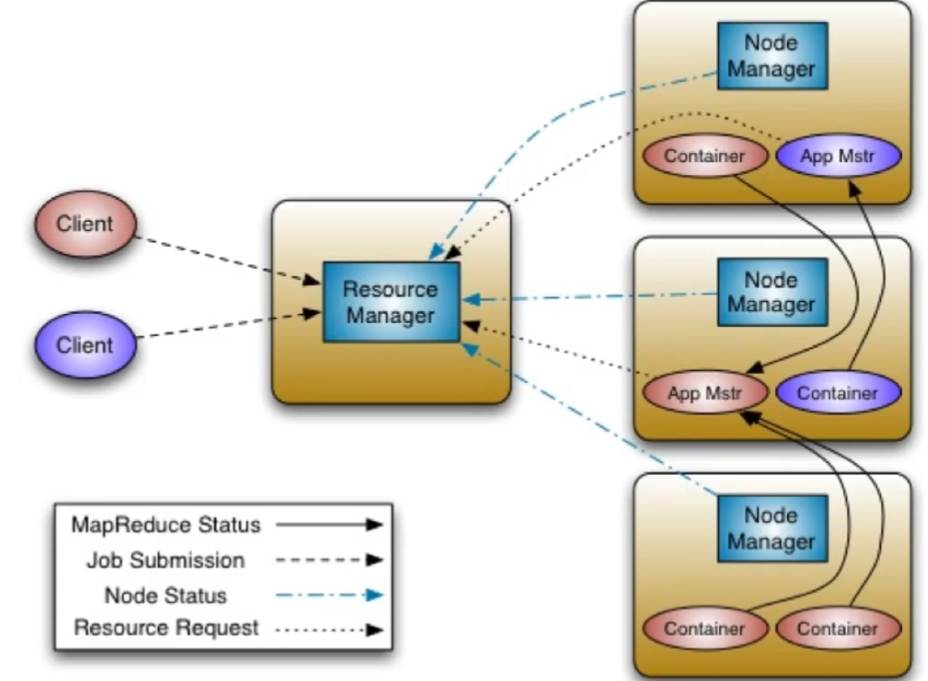
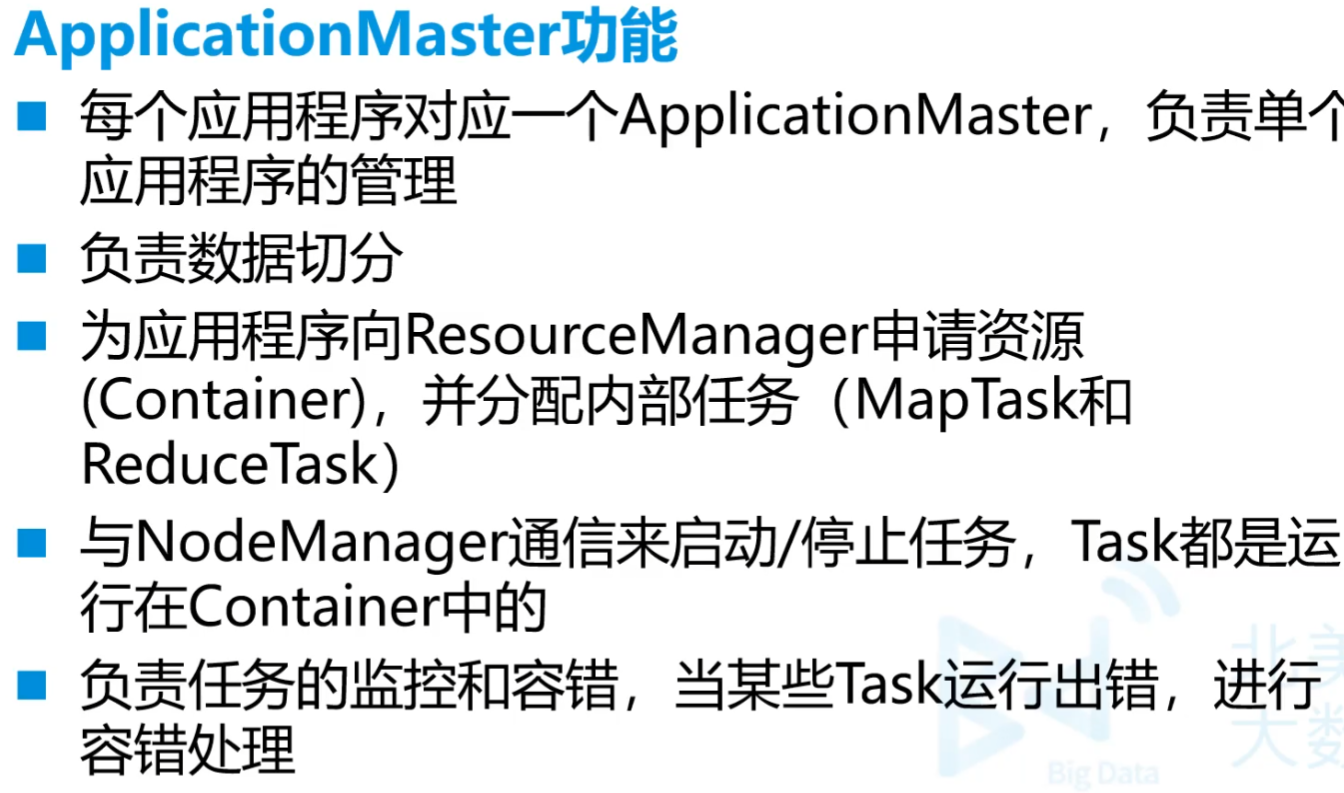
ApplicationMastper
相当于是做任务的主体,根据RM来调度空余的资源来形成Container。最后结果直接给client而不用交付RM
Container
容器,开辟空间和内存来做事。AM首先在自己的机器上开辟,不够根据RM调度,使用别人的资源来构成新Container
2.ResourceManager
- ResourceManager组成
- ResourceScheduler->资源调度器,根据节点的容量队列情况,为应用程序分配资源
- Application Manager->应用程序管理器,负责接受Client端传输的job请求
- ResourceManager功能
- 处理客户端请求
- 监控NodeManager
- 启动和监控ApplicationMaster,进行必要的重启
- 整个系统的资源分配和调度
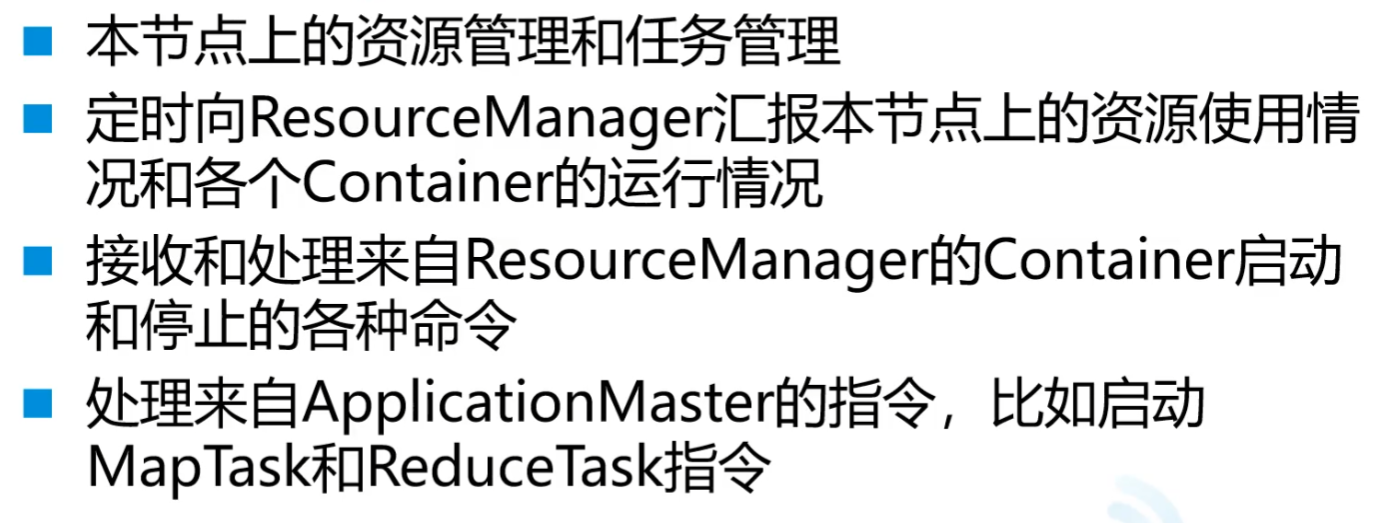
3.NodeManager
NodeManager功能
4.ApplicationMaster
5.Container

6.YARN工作原理
- 不同任务,容器也不同
7.YARN的资源调度器
目前Hadoop作业调度器有三种
FIFO:先进先出调度器
Capacity Scheduler:容量调度器
根据程序的优先级和需求,就调更多资源给它
Fair Scheduler:公平调度器
所有程序和公平分配资源
默认的作业调度器可以在yarn-default.xml文件中查看,属性如下
- yarn.resourcemanagerscheduler.class
- Hadoop版本2.6.0-cdh5.14.2的默认调度器是公平调度器
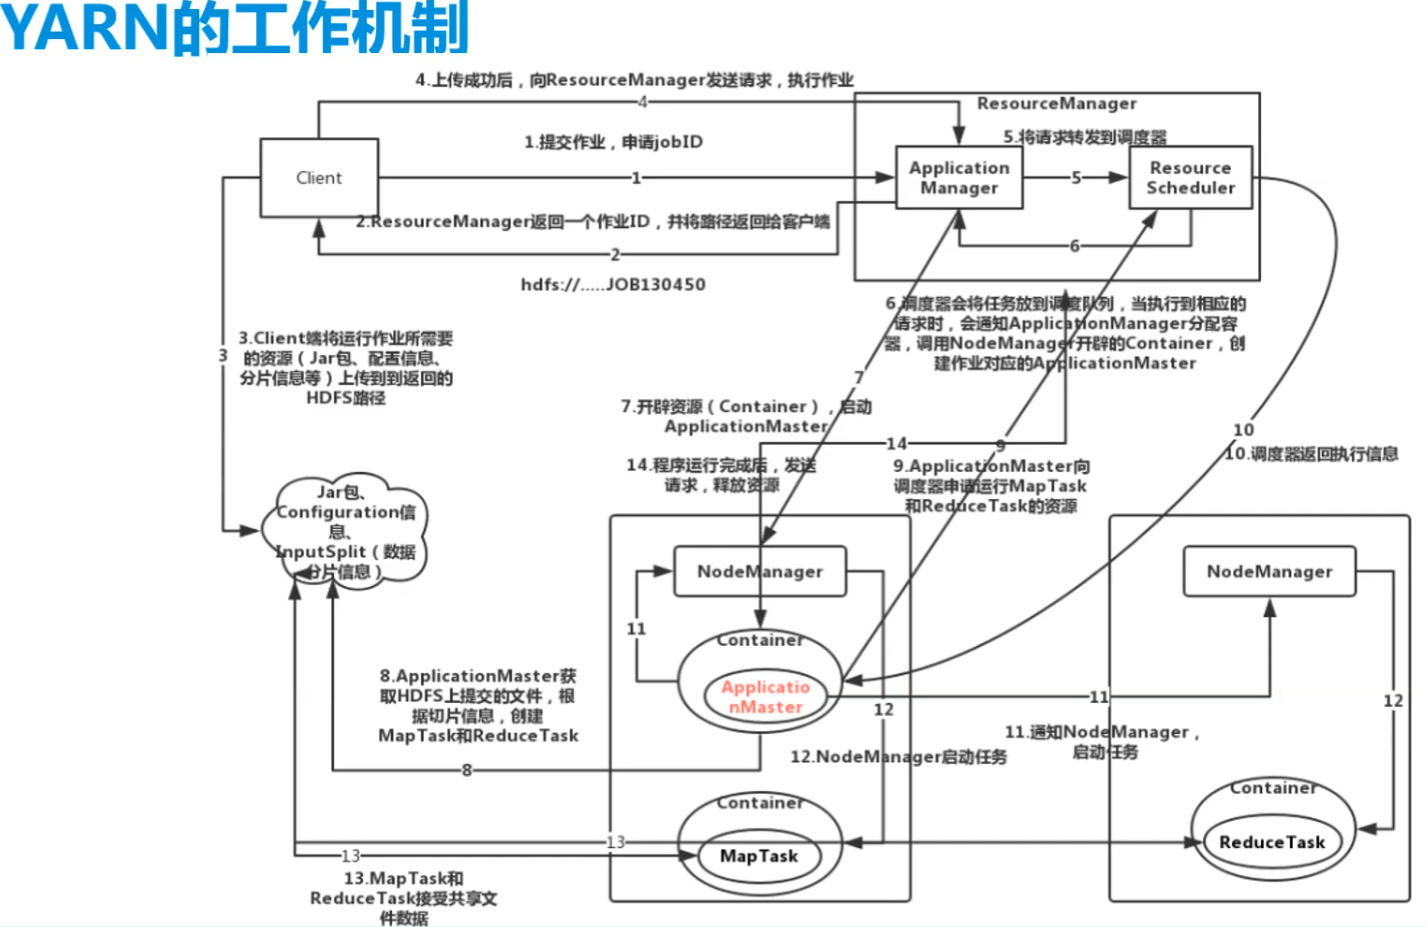
(三)任务提交
MapReduceJava项目写好
上传数据文件到所需目录
改代码地址,///是本地地址
1
FileInputFormat.setInputPaths(job,new Path("file:///opt/testdata/users.csv"));
1
FileInputFormat.setInputPaths(job,new Path("hdfs://192.168.179.139:9000/mydemo/users.csv"));
1
2FileInputFormat.setInputPaths(job,new Path(args[0]));
// 这种就要命令行传值项目打包,瘦包(不需要包依赖)因为放到hadoop环境下,本来就有
这边直接打包,胖包方法是改build中的内容,网上有
运行
hadoop jar jar包包路径 主类全限定名 [args的传入值,...]- 用args传入地址的时候
file:///opt/testdata/users.csv /opt/testdata/res/five第一个一定要用file:// 第二个不一定 - hdfs://192.168.179.139:9000/mydemo/users.csv
- 用args传入地址的时候
问题

1.大量小文件存储进入Hadoop
不适合小文件原因是单个的文件给了较大的空间,机械硬盘一般用128MB
hadoop2默认块大小就是128Mb
小文件合成大文件 (一般是同样文件格式的、结构化的数据)
用
hadoop archive归档先把小文件上传
一开始/mydemo要有建立好
1
hdfs dfs -put /opt/testdata/* /mydemo
开启压缩
ma.har名字可以改,但后缀名一定要是.har
1
hadoop archive -archiveName ma.har -p /mydemo /mydemo1
查看归档的文件
hadoop dfs和hdfs dfs没什么显著区别
1
hdfs dfs -cat /mydemo1/ma.har/part-0
2.Hadoop版本区别
- 1和2,1没有yarn,2有
- 2和3,2只有两个NameNode,但是3可以有多个NameNode
3.HDFS有哪些角色和功能
NameNode
存储文件元数据
DataNode
存储数据
SecondaryNameNode
作为NN的辅助,帮助数据持久化,单机中没有
ResourseManager
yarn节点,调度
NodeManager
作为yarn的备用节点
4.HDFS副本存放策略
- 三台机器,两台同一机架上,还有一台在其他机架上
5.HDFS读写流程
6.MapReduce的过程
7.Hadoop使用的版本
8.Hive数据倾斜
小脚本呢
1.hadoop单机启动
1 | # 五个节点+hive前后+zeppelin |
2.hadoop单机关闭
1 | zeppelin-daemon.sh stop |
3.
最后
- 标题: 大数据学习笔记1-Hadoop
- 作者: Sabthever
- 创建于 : 2025-01-11 09:28:34
- 更新于 : 2025-10-09 16:14:31
- 链接: https://sabthever.cn/2025/01/11/technology/bigdata/Hadoop1/
- 版权声明: 本文章采用 CC BY-NC-SA 4.0 进行许可。